A Simple Guide to Toilet Flush Button Replacement
A flush button replacement is one of the easiest DIY plumbing fixes a homeowner can tackle. Here's a quick overview of what's involved:
- Turn off the water supply valve behind the toilet
- Remove the tank lid and unscrew the old button locknut
- Measure your tank lid hole (commonly 38mm or 48mm)
- Buy a matching replacement button ($10–$40 at most hardware stores)
- Install the new button, trim rods to fit, and hand-tighten the locknut
- Test both flush modes and adjust rod length as needed
Most repairs take under 30 minutes and require no special plumbing skills.
When a flush button cracks, sticks, or stops responding, it's tempting to call in a pro right away. But in most cases, you don't need to. The button itself is a small, inexpensive part — and replacing it is well within reach for a confident beginner.
This guide walks you through the full process: spotting the signs of a failing button, measuring for the right replacement, installing it correctly, and fixing common problems that come up after installation.
At All Pro Service Group, after years of plumbing service across the Greater Salt Lake Valley, our team has handled every variation of flush button replacement imaginable — from simple dual-flush button swaps to full cistern repairs. If you run into anything beyond a straightforward button swap, we're here to help.
Signs You Need a Flush Button Replacement
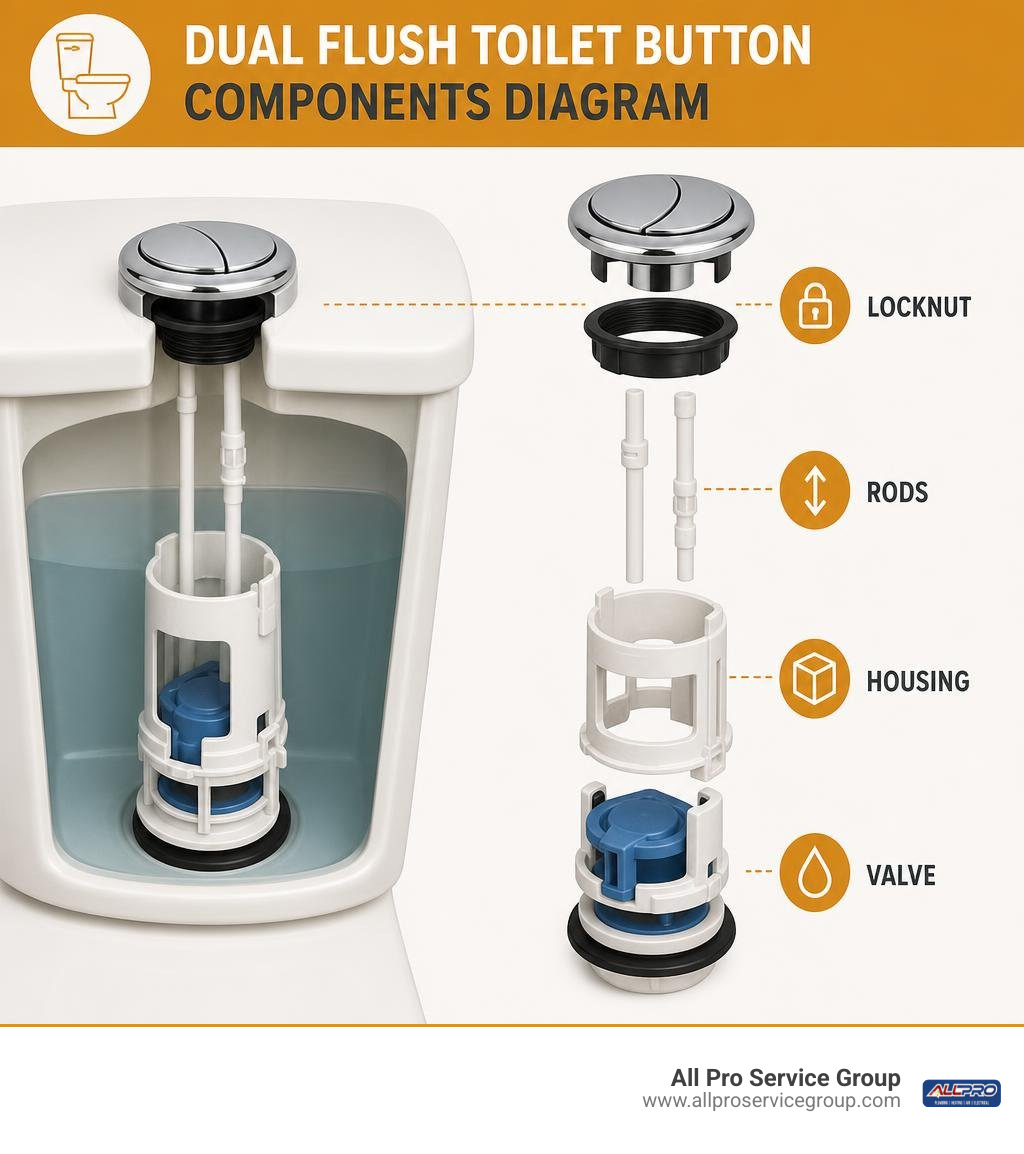
Modern dual flush toilets use top-mounted push buttons rather than traditional trip levers. Over time, plastic housings, internal springs, and actuation rods suffer wear and tear. Recognizing the early signs of failure can save you from high water bills and frustrating bathroom visits.
Here are the primary indicators that you need a flush button replacement:
- Sticky or Jammed Buttons: You press the button down to flush, but it stays depressed inside the housing instead of snapping back up. This usually points to mineral scale buildup, cracked internal guide sleeves, or weakened return springs.
- Loose or Wobbling Mechanism: If the dual push button sloshes around inside the toilet tank lid cutout, the plastic locknut underneath has either unthreaded, cracked, or stripped its plastic threads.
- Non-Responsive Flush Action: When you push either the half flush or full flush button, nothing happens. The actuation rods below may have snapped, dislodged from the flush valve, or unthreaded completely.
- Visually Cracked or Tarnished Housing: Constant moisture and harsh bathroom cleaning chemicals degrade plastic chrome finishes, causing the surface to peel, pit, or crack down the center.
- Continuous Running Water: If water trickles constantly into the bowl, the button rods might be too long or stuck down, holding the central flush valve open.
Ignoring these issues can lead to wasted water or leave your bathroom out of commission. If you notice any of these symptoms, learn how to Fix Toilet Flush Button hardware before minor annoyances turn into major plumbing headaches.
When to Replace vs Repair Internal Valves
Before ordering replacement hardware, it is critical to determine whether the problem lies in the top push button or deeper within the toilet tank mechanics.
If pressing the top button moves the underlying valve but no water flows—or water leaks continuously from the base of the tank—the button might be fine while the fill or flush valve is faulty.
- Inspect the Flush Valve Assembly: Remove the tank lid and push down manually on the flush valve tower buttons or levers. If the toilet flushes smoothly when operated manually, your internal valve is working, and you only need a top-mount flush button replacement.
- Check the Float Valve: If the tank fails to fill back up with water after a manual test flush, the fill valve or float mechanism is malfunctioning. In those cases, you will need to Fix Toilet Float Valve components or adjust the float height.
- Evaluate Valve Diaphragms & Gaskets: Rubber seal seals inside the dual flush tower degrade over time, especially if exposed to drop-in chemical toilet bowl tablets. If the top button works cleanly but water trickles constantly, replacing the rubber seal disk at the base of the valve tower is necessary alongside any button repairs.
When both the button assembly and the valve tower show signs of severe aging or heavy calcification, replacing the entire top-button flush valve kit provides a clean slate for your toilet.
Measuring Sizing and Tools for Your Toilet Project
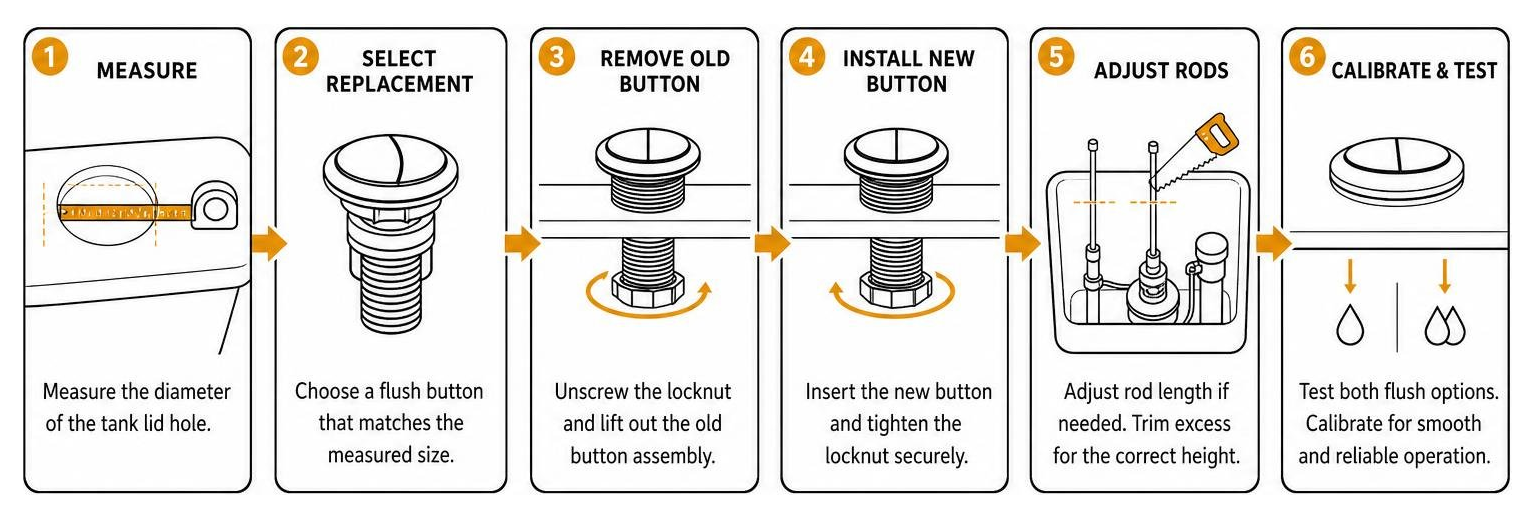
Completing a flush button replacement in a single afternoon requires taking accurate measurements and gathering a few basic household tools beforehand.
Here is the essential tool list you'll need:
- Digital Caliper or Tape Measure: To measure the diameter of the hole cut into your ceramic toilet tank lid.
- Mini Hacksaw or Fine-Toothed Utility Saw: For trimming plastic extension rods to match your tank height.
- Safety Glasses & Work Gloves: Porcelain edges on ceramic lids can be sharp, so protecting your hands and eyes is essential.
- Adjustable Pliers or Channel Locks: Helpful for gently removing stubborn, calcified locknuts (though hand-tightening is always recommended during installation).
- Ruler or Pencil: To mark exact rod lengths using your old button hardware as a visual template.
Sizing Dual Flush Buttons Correctly
One of the most common mistakes DIYers make when buying replacement parts is purchasing a push button without measuring their tank lid cutout hole first. Flush buttons are not universal across all toilet models.
- Measure Thread Diameter (Lid Opening): Turn off the water supply, remove the lid, and turn it upside down. Measure the circular cutout hole across its wide center point.
- 38mm Thread Diameter: The standard size for most modern dual flush two-piece toilets, including models by Glacier Bay, American Standard, Porcher, and Swiss Madison.
- 48mm Thread Diameter: Common on larger one-piece toilets or heavy-duty commercial style tanks requiring wider button assemblies.
- Determine Tank Flush Opening: Beyond the lid cutout, verify your internal flush valve size if you are replacing the complete valve assembly. Standard two-piece dual flush toilets usually feature either a 2-inch or a 2.5-inch tank discharge opening on the tank floor. Products like the Universal, Top Button Flush Valve For Two Piece Toilets & 2.5 Inch Flush Hole - NuFlush are specifically built to fit these 2.5-inch discharge dimensions while incorporating a standard 38mm top button housing.
If you own specific designer toilet fixtures, check manufacturer model numbers printed on the interior porcelain wall:
- Eljer Versailles models require a 2 Inch Or 2.5 Inch Top Button Flush Valve Replacement For Eljer Versailles Two-Piece Toilet - NuFlush.
- Porcher Veneto units utilize model-specific configurations such as the Top Button Flush Valve Replacement For A Porcher Veneto Toilets Model Number: #97120 - NuFlush.
- Eljer Sophie series toilets pair with dedicated assemblies like the Top Button Flush Valve Replacement For A Eljer Sophie Toilets - NuFlush.
Choosing Universal vs Brand-Specific Flush Button Replacement Parts
Homeowners often wonder whether they must purchase brand-specific replacement components or if universal dual-flush hardware will suffice.
- Universal Fitment Parts: Universal push buttons are designed with generic threaded shafts (typically 38mm or 48mm) and extra-long, customizable actuation rods. Universal designs fit over 80% of top-mounted two-piece toilets on the market. Multi-pack generic options like WOFASHPURE Toilet Flush Button Replacement, Dual Push ... offer quick, affordable fixes for standard 38mm cutouts.
- Brand-Specific Hardware: Certain luxury or specialty toilets feature unique button geometry, convex button shapes, or proprietary latching mechanisms. For instance, pressure-assisted flush tanks require dedicated components like the Flushmate Official Parts Store: DP400999-1 Flushmate Push Button Convex. Similarly, brand-tailored options such as the Replacement Dual Flush Push Buttons for Glacier Bay Toilets(like the Fluidmaster 800P-001) are engineered specifically for 3-inch dual flush valves on Glacier Bay two-piece toilets.
- Price Expectations: Replacement flush buttons are highly affordable, generally ranging between $10 and $40. Basic universal dual-flush buttons start around $9.98, while specialized flush plate trim or designer brand buttons (such as Swiss Madison's Sublime TPT81 hardware) range between $20 and $40.
Step-by-Step DIY Flush Button Replacement Guide
Now that you have selected the correct part and prepared your work area, follow these step-by-step installation instructions to complete your flush button replacement.
Removing Old Housing and Measuring Rods
- Shut Off Water Supply: Locate the shutoff valve on the wall directly behind your toilet. Turn the handle clockwise until tight. Flush the toilet once to drain water from the cistern.
- Remove Tank Lid Carefully: Lift the heavy ceramic lid off the cistern and place it upside down on a thick towel laid across a sturdy, flat surface to avoid scratching or cracking the porcelain.
- Unthread the Old Locknut: On the underside of the tank lid, locate the plastic retaining nut securing the push-button shaft to the lid cutout. Unthread the nut counter-clockwise by hand. If mineral deposits make it difficult to turn, use adjustable pliers to break the seal, taking care not to over-torque the ceramic lid.
- Remove Button Assembly: Push the old button housing out through the top of the lid.
- Measure Rod Extensions: Lay the old push button beside your new replacement assembly. Measure the plastic actuation rods protruding from the bottom of the housing. These plastic threaded rods push down on the internal flush valve when you press the top buttons. According to official guidelines like the Finishing Up Install Replacement Button manual, establishing exact rod length before installation prevents continuous running water or short-flushing issues.
Trimming Extension Rods and Securing the Assembly
New push button replacement kits ship with long, adjustable plastic rods designed to accommodate various tank heights. You must cut these rods down to fit your specific setup.
- Unscrew Spacer and Rubber Washers: Remove any rubber tips, lock rings, or spacers attached to the bottom ends of the new extension rods.
- Mark the Rod Length: Compare the new rods to the old ones. Mark the new plastic rods at the exact segment notch matching your original rod length.
- Trim with a Mini Hacksaw: Using a mini hacksaw or plastic pipe cutter, cut through the plastic rods along the marked notch. Smooth away any plastic burrs or sharp edges with fine sandpaper.
- Reattach Accessories: Screw the protective rubber pads or spacer rings back onto the tips of your newly trimmed extension rods.
- Mount Button into Lid: Insert the main button housing into the top hole of your ceramic lid. Ensure the partial flush icon (often marked with small dots or a half-moon shape) aligns logically with the corresponding half-flush valve tower lever inside the tank.
- Hand-Tighten Locknut: Thread the plastic mounting nut onto the underside of the housing shaft. Hand-tighten the nut firmly against the porcelain. Warning: Never over-tighten locknuts with wrenches or heavy tools; excess pressure can snap the plastic housing or shatter the ceramic lid.
Calibrating Liquid and Solid Waste Flush Volume
With the hardware installed, you must calibrate rod clearance to ensure both liquid (partial) and solid (full) waste flushes operate efficiently.
- Lower Lid Back onto Cistern: Carefully place the tank lid back onto the toilet cistern body.
- Verify Rod Clearance: Ensure the bottom tips of the actuation rods do not press down constantly on the internal flush valve levers when the lid rests in its resting position.
- Ideal Clearance: Keep a small gap—approximately 0.25 inches (1/4 inch) —between the tip of each rod and the top contact surface of the flush valve levers.
- Fine-Tune Length: If pressing the top buttons feels soft or fails to trigger a flush, lift the lid and rotate the threaded rods counter-clockwise by a few turns to extend them. Conversely, if the toilet runs constantly after placing the lid down, the rods are too long; rotate them clockwise (or cut one additional plastic segment) to shorten them.
- Test Flushing: Turn the water supply valve back on and allow the cistern to fill. Perform a test press on the half-flush button to check liquid rinse volume, followed by a full-flush press to confirm full tank discharge.
Troubleshooting Common Post-Installation Flush Issues
Even straightforward DIY plumbing projects can occasionally encounter minor hiccups. Here is how to resolve common problems after completing your flush button replacement:
| Problem | Cause | Solution |
|---|---|---|
| Toilet Runs Continuously | Extension rods are too long and constantly press down on the valve. | Unscrew plastic rods clockwise or trim one segment using a mini hacksaw to maintain a 0.25-inch gap clearance. |
| Weak Flush / Partial Flush Fails | Extension rods are too short, failing to open the flush valve completely. | Rotate plastic rods counter-clockwise to extend their length until proper valve actuation is achieved. |
| Button Sticks Down inside Housing | Misaligned lid, overtightened locknut, or mineral scale friction. | Loosen locknut slightly, realign button orientation inside lid cutout, and ensure smooth vertical travel. |
| Water Trickles into Bowl constantly | Worn rubber flapper / seal disk at the base of the dual flush tower. | Inspect internal tower seal. Replace worn rubber gaskets or upgrade internal tank hardware. |
If you discover that the problem extends beyond the button hardware into deeper tank mechanisms, review our comprehensive Toilet Repair Complete Guide 2026 for step-by-step guidance on complete system overhauls. When internal tower components become calcified or broken, learning about Changing Toilet Valve assemblies will fully restore your commode's performance.
If you encounter unexpected leaks around the base after tackling tank repairs, see our troubleshooting guide for a Commode Leaking Around Base. If you feel unsure about internal tank mechanisms, explore our detailed guides on fixing a Broken Toilet or mastering broad Plumbing Repair Complete Guide 2026 techniques.
Frequently Asked Questions About Cistern Buttons
How do I know what thread size flush button to buy?
Measure the cutout hole on the top of your ceramic tank lid using a tape measure or digital caliper. The vast majority of modern dual-flush two-piece toilets use a 38mm (approx. 1.5-inch) thread diameter shaft. Larger one-piece toilets or heavy-duty commercial tanks typically take a 48mm (approx. 1.9-inch) thread diameter button housing.
Why does my toilet run constantly after replacing the button?
A toilet that runs constantly after button installation almost always has actuation rods that were left too long. When you set the heavy ceramic tank lid back onto the tank, long plastic rods press down continuously on the internal flush valve levers, holding the bottom seal open. To fix this, unthread the rods by a few turns or trim off one small segment using a mini hacksaw so that a 0.25-inch gap exists between the rod tips and the valve when at rest.
How much does a replacement flush button cost?
A replacement dual-flush push button costs between $10 and $40. Basic universal replacement buttons retail online or at local home centers for around $9.98 to $15. OEM brand-specific hardware or high-end designer finishes generally cost between $20 and $40.
Conclusion
A flush button replacement is one of the most cost-effective and empowering DIY plumbing projects you can complete. By accurately measuring your tank lid cutout (whether 38mm or 48mm), selecting the right replacement unit, and trimming plastic extension rods to achieve proper clearance, you can eliminate sticking buttons, stop continuous running water, and restore clean dual-flush operation in under 30 minutes.
While replacing a top push button is a simple fix, deeper bathroom repairs—such as replacing faulty supply lines, addressing subterranean leaks, or repairing complex concealed cistern systems—can present unforeseen challenges.
Whenever home plumbing projects extend beyond standard surface maintenance, trust the trained experts at All Pro Service Group. Serving homeowners across Salt Lake City, West Jordan, South Jordan, Provo, Ogden, Park City, West Valley City, and the Greater Salt Lake Valley since 2008, our team delivers dependable repair, replacement, and inspection services backed by clear pricing and exceptional customer care.
When you need professional help, contact us for expert Professional Plumbing Repair Services to keep your home's plumbing running smoothly.