Stop flushing money away by changing your toilet valve
Stop Flushing Money Away: What You Need to Know About Changing a Toilet Valve
Changing your toilet valve is one of the easiest plumbing fixes a homeowner can do — and it takes less than 30 minutes with basic tools.
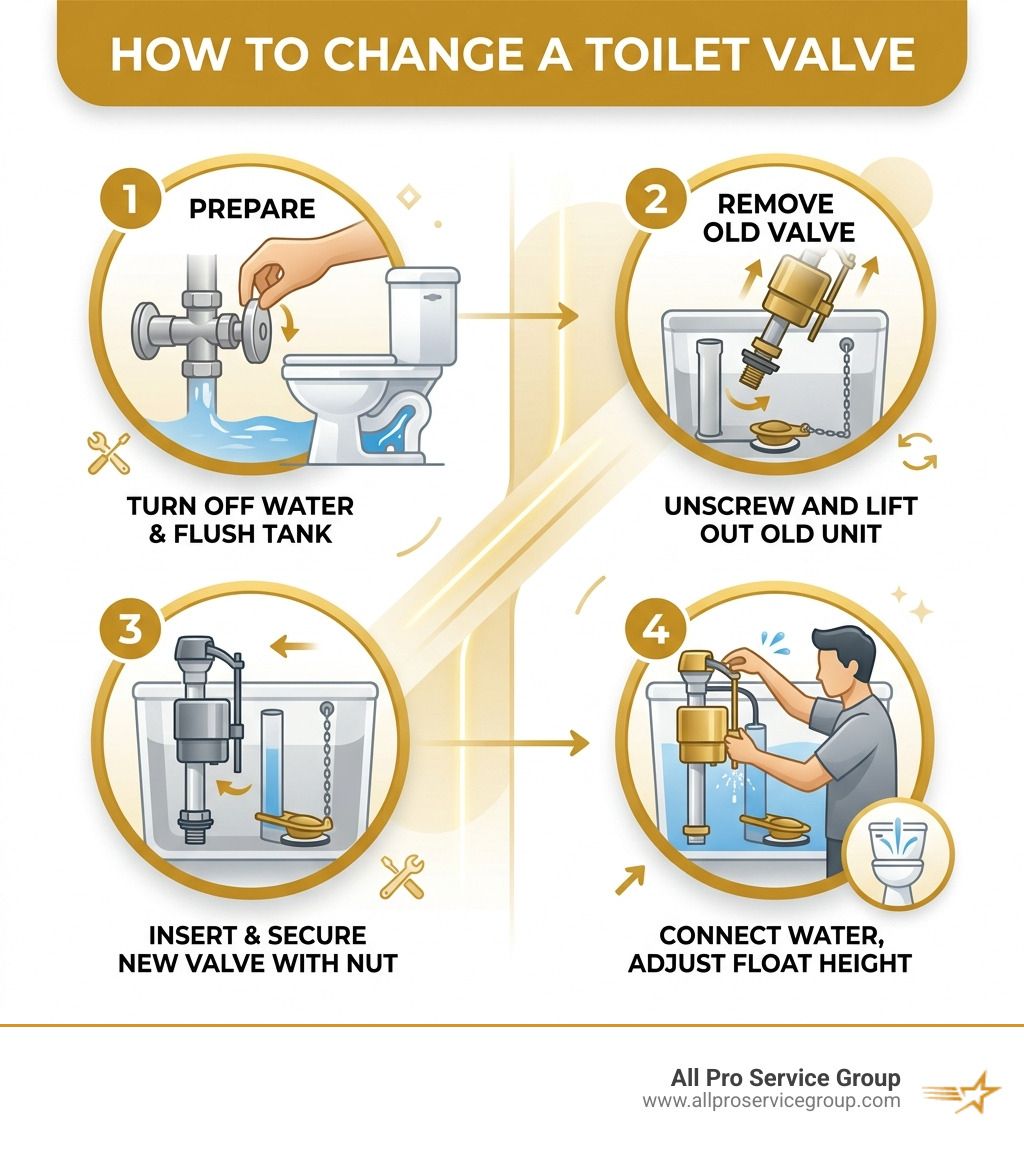
Here's a quick overview of the process:
- Turn off the water supply valve (clockwise) behind the toilet
- Flush to drain the tank, then sponge out the rest
- Disconnect the water supply line and unscrew the mounting nut
- Lift out the old fill valve
- Adjust the new valve to the correct height and drop it in
- Hand-tighten the nut, reconnect the supply line, and attach the refill tube
- Turn the water back on and check for leaks
A new universal fill valve costs around $15–$20 and fits roughly 98% of toilets. No special skills required.
A running toilet isn't just annoying — it's expensive. A slow leak can waste 30 gallons of water per day, and a medium leak can burn through 250 gallons daily. That's money disappearing with every flush.
The good news? The fix is almost always a worn-out fill valve, and replacing it yourself is well within reach for most homeowners.
I'm Gary Leany, owner of All Pro Service Group, and after years of handling plumbing repairs across the Greater Salt Lake Valley, I've seen how often a simple fill valve swap — when done right — saves homeowners from costly water bills and bigger repairs down the line. In this guide, I'll walk you through everything you need to know about
changing your toilet valve safely and confidently.
Understanding the Toilet Fill Valve and When to Replace It
Before we roll up our sleeves, let’s talk about what this part actually does. The toilet fill valve is the tall internal component that controls the water coming into your tank. When you flush, the water level drops, the float falls, and the valve opens to refill the tank. Once the water reaches a specific height, the float shuts the valve off.
It’s the gatekeeper of your toilet’s water consumption. If the gatekeeper is tired or broken, your water bill will reflect it. Most fill valves have a lifespan of about 5 to 7 years, though many experts suggest replacing them every 4 to 5 years to stay ahead of potential leaks. In areas like Salt Lake City or Provo, where water mineral content can vary, sediment buildup is a common culprit for valve failure. These minerals act like sandpaper on the internal seals, eventually preventing the valve from closing completely.
There are two main types of fill valves you’ll encounter:
| Feature | Ball Float Valve (Old Style) | Float Cup Valve (Modern Style) |
|---|---|---|
| Appearance | Long metal rod with a round ball at the end | Compact cylinder with a donut-shaped float |
| Adjustment | Requires bending the rod or turning a screw | Simple sliding clip or adjustment screw |
| Reliability | Prone to bending and corrosion | Sleek, modern, and less likely to snag |
| Space | Takes up a lot of room in the tank | Compact; fits almost any tank size |
Most modern replacement kits use the float cup design because they are universal and much easier to adjust. If you’re still rocking a ball float,
changing your toilet valve to a modern cup style is a great upgrade for your home's efficiency. For a deeper look at how your entire system works, check out our
Toilet Repair Complete Guide.
Identifying Signs of a Faulty Valve
How do you know it’s time to move on? Your toilet usually tries to tell you through a few distinct "symptoms":
- The Phantom Flush: You’re sitting in the living room and suddenly hear the toilet start refilling for a few seconds even though no one used it. This often means the valve is failing to stay shut or the flapper is leaking, causing the fill valve to kick on periodically.
- The Screaming Toilet: If your toilet makes a high-pitched whistling or "screaming" noise when it refills, the internal seals in the valve are likely vibrating or torn.
- Constant Running: If the water never stops flowing into the overflow tube, the valve isn't shutting off. This can waste up to 73,000 gallons of water a year!
- Slow Refill: If it takes forever for the tank to fill back up, sediment has likely clogged the intake.
If you aren't sure if the valve is the culprit or if there's a deeper issue in your plumbing, we recommend professional
Plumbing Inspections to catch small problems before they become basement-flooding disasters.
Preparation: Tools and Draining the Tank
One of the best things about changing your toilet valve is that you don't need a massive toolbox. In fact, you probably already have everything you need in your garage or under the kitchen sink.
What You’ll Need:
- New Universal Fill Valve: These usually cost under $20. Brands like Fluidmaster or Korky are common and fit about 98% of standard toilets.
- Adjustable Wrench or Pliers: To loosen the water supply line.
- A Bucket: To catch the small amount of water left in the line.
- A Large Sponge and Towels: For soaking up the residual water at the bottom of the tank.
- A Small Container: To bail out water if you don't have a sponge.
Before you start, it’s a good idea to inspect the shut-off valve on the wall behind the toilet. If that valve is stuck or leaking, you might need to follow a guide on
How to Replace a Toilet's Shut-Off Valve before proceeding with the internal tank repair.
Safely Draining the Water Supply
We can’t work on the tank while it’s full of water (unless you want a very wet bathroom floor).
- Shut off the water: Locate the silver handle on the wall behind the toilet. Turn it clockwise until it stops. If it’s a push/pull valve, pull it out or push it in depending on the model.
- Flush the toilet: Hold the handle down to get as much water out of the tank as possible.
- Remove residual water: There will always be about an inch of water left at the bottom that the flush can't reach. Use your sponge to soak this up and wring it out into the toilet bowl or your bucket. You want the tank as dry as possible so that when you remove the old valve, water doesn't pour out onto your floor.
If you find that the water keeps trickling into the tank even after the valve is shut off, your main shut-off might be failing. In that case, give us a call for
plumbing assistance in the West Jordan or South Jordan areas.
Step-by-Step Guide to Changing Toilet Valve
Now for the main event.
Changing your toilet valve is a straightforward mechanical process. Think of it like Lego for adults—everything fits together in a specific way.
When you look at the bottom of your toilet tank from the outside, you’ll see where the water line connects to the tank. This is where the fill valve is secured. If you ever feel overwhelmed during this process, our team provides expert
Plumbing Repair across the Salt Lake Valley.
Removing the Old Unit and Changing Toilet Valve
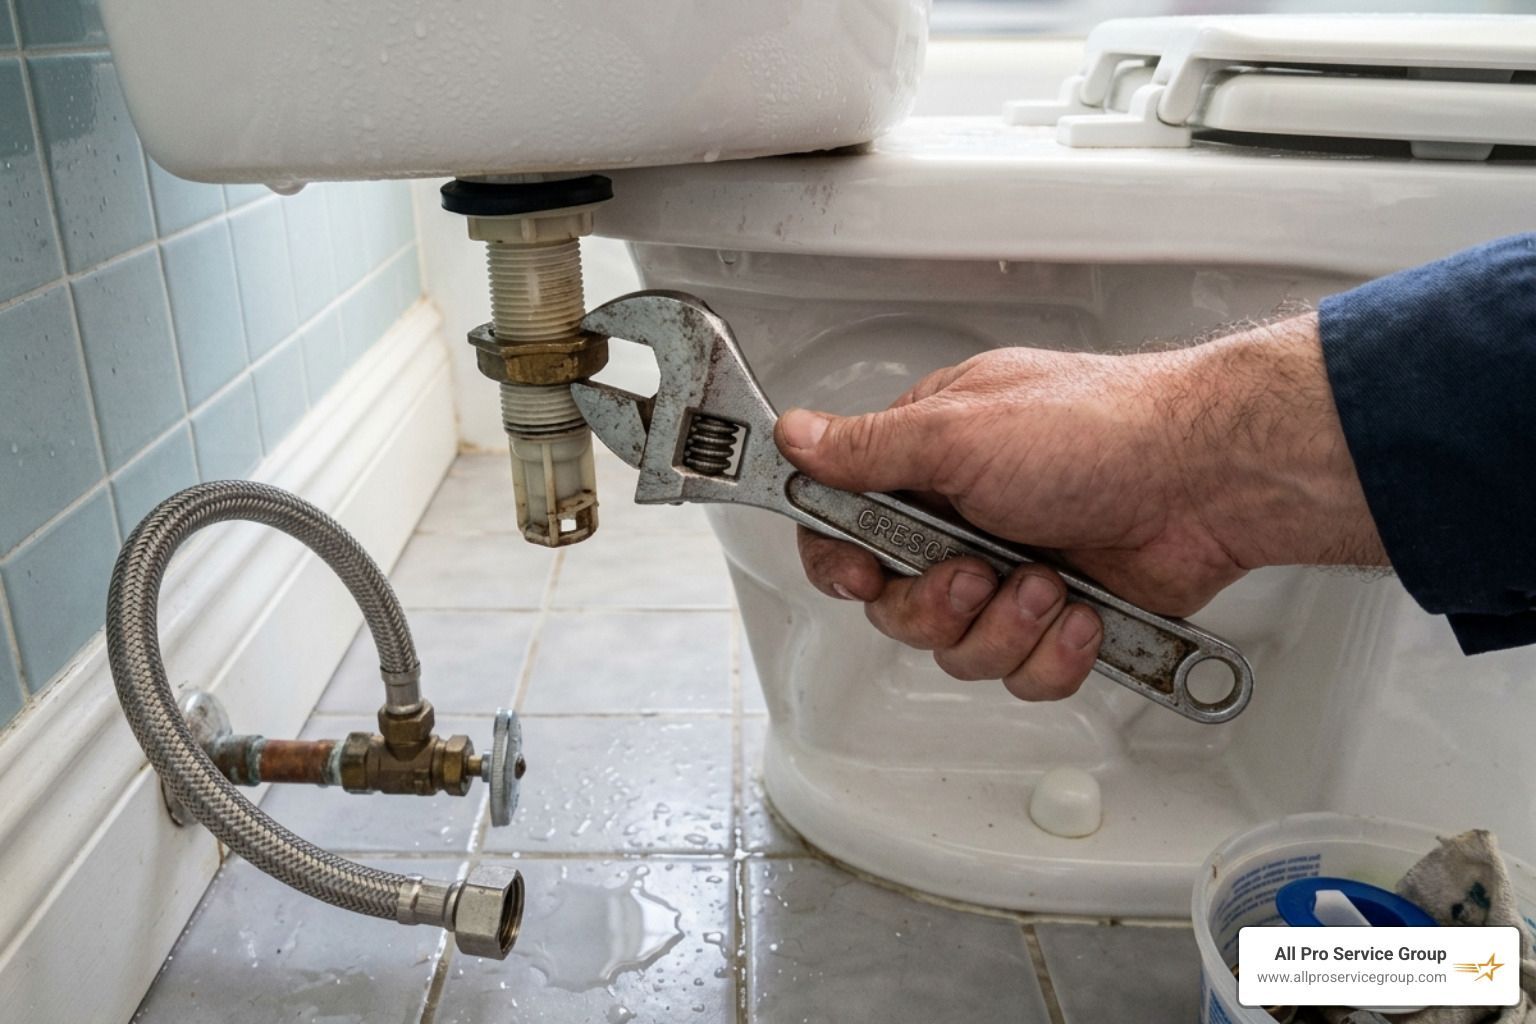
- Disconnect the supply line: Place your bucket under the connection. Use your pliers or wrench to unscrew the coupling nut (the top nut on the flexible hose) from the bottom of the toilet tank.
- Remove the mounting nut: Once the hose is out of the way, you’ll see a plastic mounting nut flush against the bottom of the tank. This holds the valve in place. Unscrew this nut.
- Expert Tip: Because you are reaching under the tank, the nut is technically upside down. This means it might feel like "lefty-tighty, righty-loosey." Just remember that if you were looking at it from the floor up, it follows the standard "lefty-loosey" rule.
- Lift the old valve out: Reach into the tank and pull the old valve straight up. Make sure the old rubber shank washer comes out with it. If it’s stuck to the porcelain, peel it off.
- Clean the area: Use your sponge to wipe away any sediment or "scum" around the hole. A clean surface ensures the new valve’s rubber seal creates a watertight bond.
For a visual breakdown of this removal, this guide on
DIY Toilet Repair: Replacing a Faulty Water Fill Valve Made Easy is a fantastic resource.
Installing the New Valve and Refill Tube
Now, let’s get the new one in.
- Adjust the height: Most universal valves are "telescoping." Before putting it in the tank, compare it to your old valve. You want the top of the fill valve (the "cap") to be about 2 to 3 inches higher than the top of the overflow pipe (the open pipe in the middle of the tank). Twist the base of the valve to extend or shorten it.
- Seat the valve: Drop the new valve into the hole. Ensure the rubber washer is at the base of the valve inside the tank.
- Secure the nut: From underneath the tank, screw on the new plastic mounting nut. Hand-tighten only! You want it firm, but using pliers to crank it down can crack the porcelain tank or the plastic nut itself.
- Connect the refill tube: This is the small rubber hose that comes with the kit. Attach one end to the small nipple on the side of the fill valve. Attach the other end to the included angle clip and snap it onto the top of the overflow pipe.
- Critical Step: Do not just shove the tube down into the overflow pipe. It should sit above it. If the tube is below the water line inside the pipe, it can create a "siphon" effect that constantly drains your tank and keeps the water running.
Adjusting and Testing Your New Valve
Once the valve is physically installed, you need to "tune" it. This ensures the water stops at the right level—usually about an inch below the top of the overflow pipe or at the "Water Level" mark stamped on the back of the tank.
- Reconnect the water line: Screw the supply line coupling nut back onto the threaded shank of the new valve. Again, hand-tighten, then give it maybe a quarter-turn with pliers.
- The "Moment of Truth": Slowly turn the wall shut-off valve counter-clockwise. Watch the bottom of the tank for any drips. If you see a small leak, give the mounting nut a tiny bit more tension.
- Adjust the water level: As the tank fills, watch where the water stops. If it’s too low, your flush will be weak. If it’s too high, it will spill into the overflow pipe. Use the adjustment screw (usually a plastic rod or screw on the float) to raise or lower the float.
- The Flush Test: Flush the toilet a few times. Ensure the flapper closes properly and the fill valve shuts off cleanly when the tank is full.
If you notice water pooling around the base of the toilet or from the supply line even after tightening, you might have a hidden leak. Our Leak Detection Repair services are designed to find those sneaky drips before they rot your subfloor.
Avoiding Common Installation Mistakes
Even for a simple job like changing your toilet valve, there are a few traps you can fall into:
- Overtightening: This is the #1 mistake. Plastic threads and porcelain are brittle. If you tighten the nuts too much, you can crack the tank, leading to a much more expensive repair.
- Kinked Lines: Ensure your flexible supply line isn't twisted or kinked. If it's old and stiff, this is the perfect time to spend $5 on a new braided metal supply line.
- Float Obstruction: Make sure the float cup can move up and down freely. Sometimes it can get stuck against the side of the tank or the flush lever arm.
- Ignoring the Refill Tube: If the refill tube isn't aimed into the overflow pipe, your bowl won't refill properly, leading to poor flush performance and potentially letting sewer gases into your home.
For more pro tips on avoiding these blunders, the The DIYer's Guide to Toilet Fill Valve Replacement | Family Handyman offers great advice on fine-tuning the mechanics.
Frequently Asked Questions
What should I do if the toilet still runs after changing toilet valve?
If you’ve replaced the fill valve and the water is still running, the problem is likely the flapper. The flapper is the rubber plug at the bottom of the tank. If it’s warped or covered in mineral deposits, water will leak from the tank into the bowl, causing the fill valve to turn on to replenish the lost water. Also, check the chain slack; if the chain is too tight, it may be holding the flapper open.
How often should I perform maintenance on my fill valve?
We recommend a visual check every 6 months. Take the lid off and make sure the water level is correct and there’s no visible corrosion. In high-sediment areas like Ogden or Park City, you may want to "flush" the valve once a year by removing the top cap and letting water spray out into a bucket to clear any debris. Generally, plan on changing your toilet valve every 5 years.
Common Issues When Changing Toilet Valve
- Wrong Valve Size: While 98% are universal, some high-end or older toilets use a 3-inch flush valve instead of the standard 2-inch. Measure the opening at the bottom of the tank before you head to the hardware store.
- Rusted Bolts: If you have to remove the tank to replace a flush valve (different from a fill valve), you might encounter rusted bolts. These often need to be cut off with a hacksaw.
- Supply Line Leaks: If the old supply line has a rubber gasket that has hardened, it won't seal against the new valve. Always check the condition of the hose.
Conclusion
Changing your toilet valve is a rewarding DIY project that saves you money on your monthly utility bills and prevents water damage in your home. It’s a 30-minute investment that pays for itself almost immediately.
However, we know that not everyone has the time or the desire to get their hands in a toilet tank. If you’re in the Greater Salt Lake Area—from Salt Lake City to Provo and everywhere in between—All Pro Service Group is here to help. Since 2008, we’ve provided dependable, Gephardt Approved plumbing, heating, and electrical services.
Whether you need a simple
Plumbing Repair or a full home inspection, our trained experts are available 24/7 to ensure your home stays comfortable and efficient. Don't let a running toilet flush your hard-earned money away. Give us a call today, and we'll make sure your plumbing is in "All Pro" shape!