When Your Toilet Flush Button Stops Working
The fastest ways to fix a toilet flush button are:
- Button stuck down — Clean mineral buildup around the housing with white vinegar and gently wiggle the button free.
- Button does nothing — Check that the actuator rod or cable inside the tank is connected and properly adjusted.
- Toilet keeps running — Shorten or re-tension the actuator rod, or replace the flush valve seal if it is worn.
- Loose or wobbly button — Hand-tighten the plastic retaining ring on the underside of the cistern lid.
- Weak flush — Check that the water level in the tank sits about 1 inch below the overflow pipe.
A broken toilet flush button is one of those problems that feels small — until it isn't. You press the button, nothing happens, and suddenly the one thing your household depends on dozens of times a day is out of commission.
The frustrating part? Most flush button failures are mechanical, not catastrophic. A stuck button, a loose rod, a worn seal — these are fixable problems. You don't always need a plumber, and you don't need to panic.
That said, running toilets are not a minor inconvenience from a cost standpoint. Household water waste from running toilets costs American families over $35 billion annually — and a faulty flush button is often the silent culprit behind a toilet that never quite stops running.
This guide walks you through every common flush button problem, from a stuck dual-flush button to a completely unresponsive mechanism, with clear steps to fix each one.
At All Pro Service Group, our team has been diagnosing and repairing plumbing issues — including helping homeowners fix toilet flush button problems — across the Greater Salt Lake Valley since 2008. Whether it's a quick adjustment or a full valve replacement, we've seen every variation of this problem and know exactly what it takes to resolve it for good.
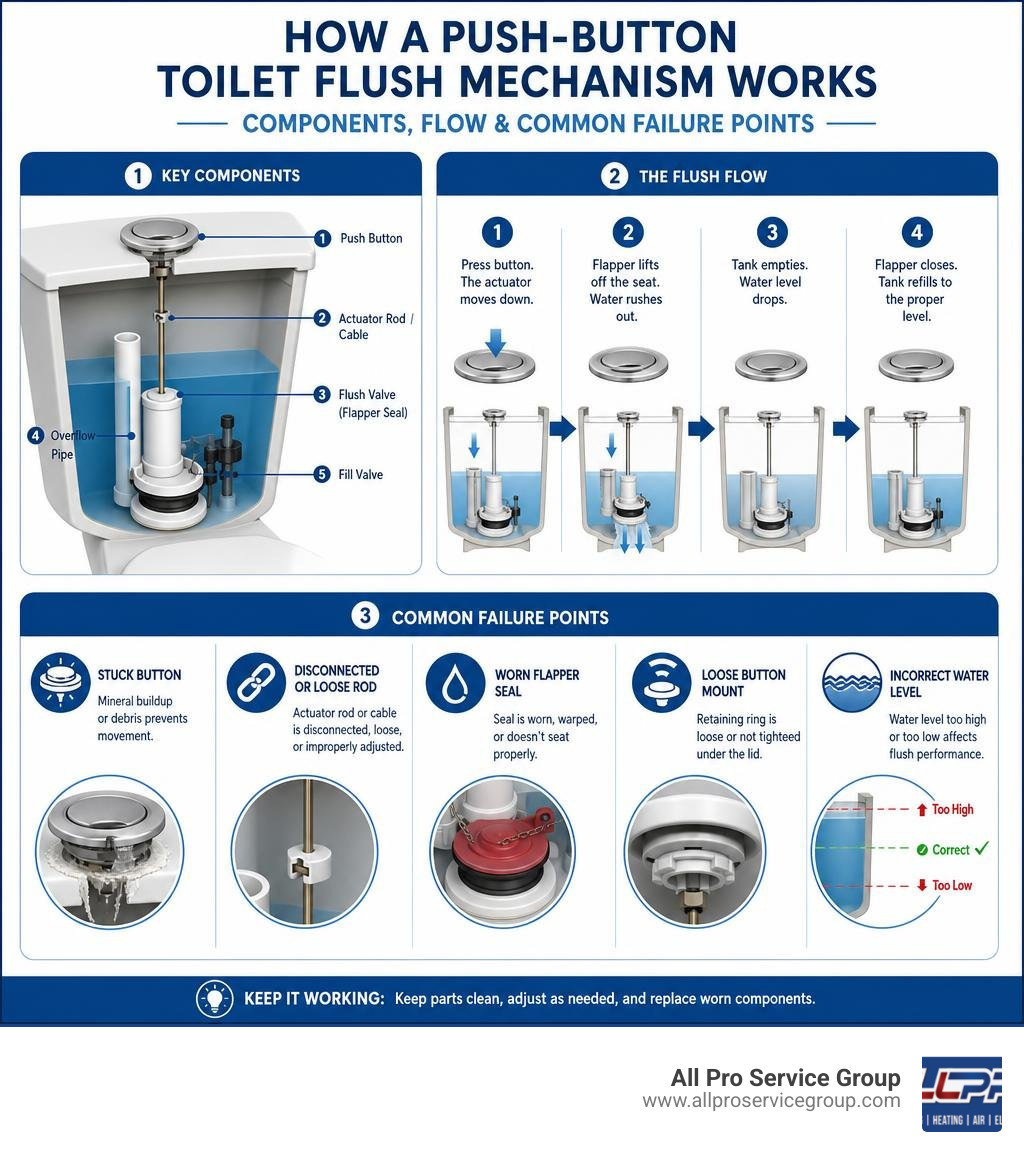
Why Is Your Toilet Flush Button Not Working?
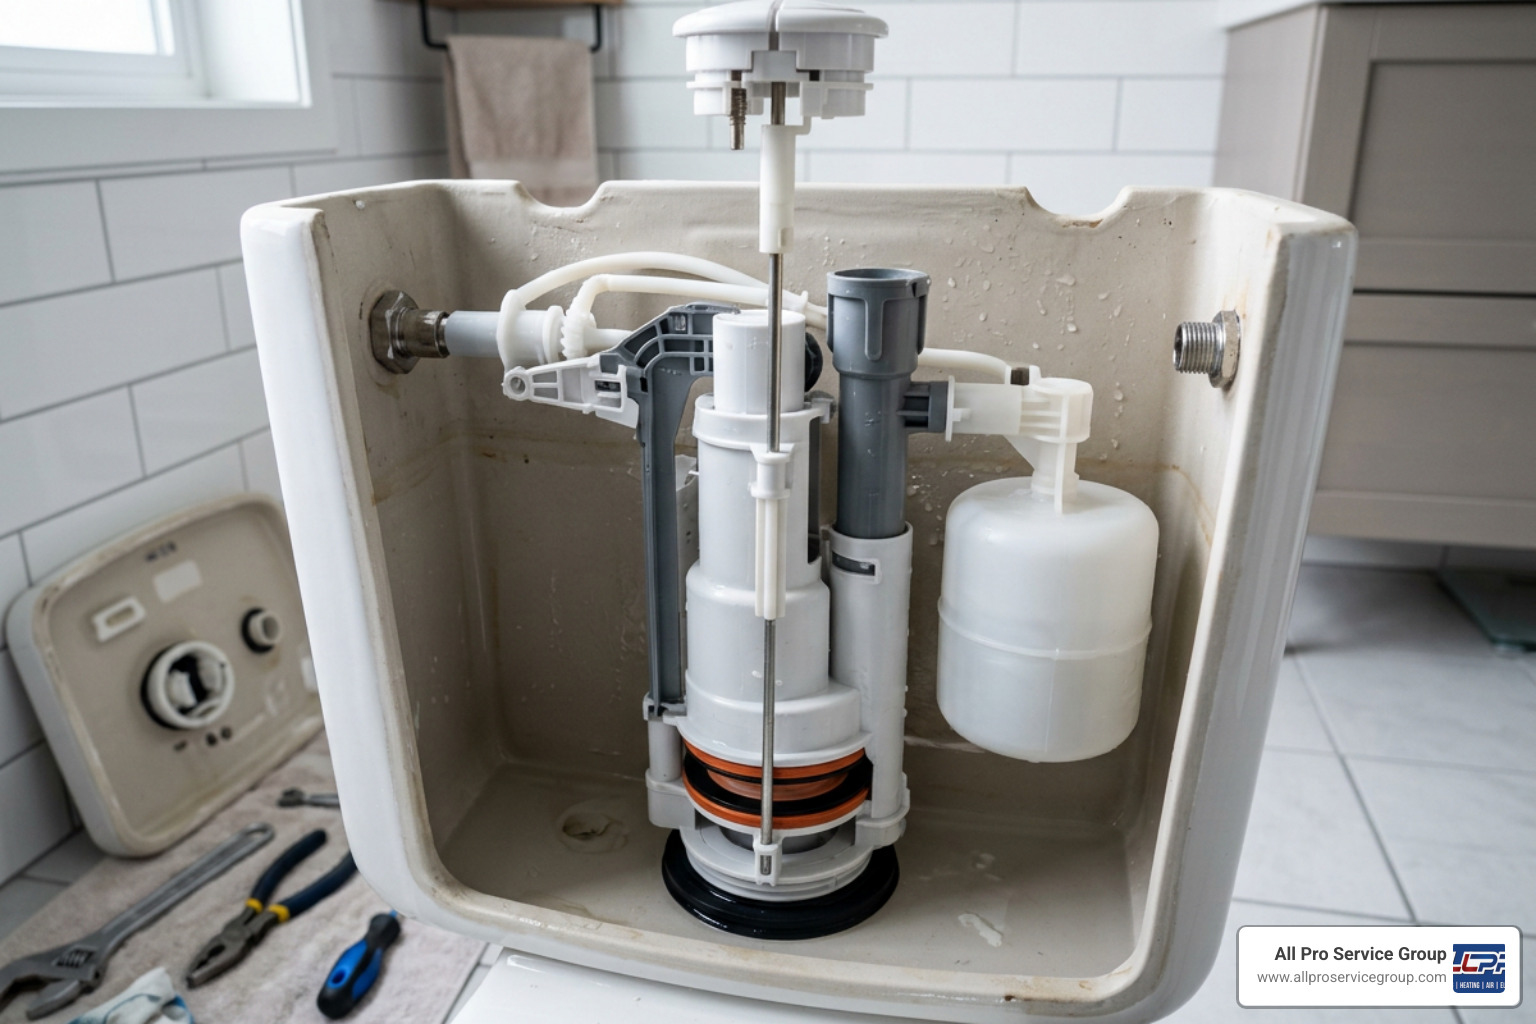
To understand why your flush button is acting up, it helps to understand how modern push-button toilets differ from traditional lever-style units.
Older toilets rely on a simple handle, metal lever, and a lift chain connected to a rubber flapper. When you pull the handle, gravity and a quick tug lift the flapper, releasing water. Modern toilets, however, rely on precise mechanical translation via flexible cables or rigid plastic rods (actuators) that directly depress a central flush tower.
While this modern design is incredibly efficient, it has tighter mechanical tolerances. A standard lever toilet uses about 3.5 gallons per flush. By contrast, a properly calibrated dual-flush button toilet uses just 1.28 gallons for a half flush and 2.6 gallons for a full flush. Upgrading to these water-efficient fixtures can reduce indoor water use by 30% and cut water bills by roughly $33 per month. However, if the components inside the tank drift out of alignment even slightly, the system fails.
If you are dealing with a broken toilet, the issue usually boils down to one of these common culprits:
- Limescale and Mineral Buildup: This is especially common across Utah, from Salt Lake City to West Jordan and Provo. Our local water supply is rich in minerals. Over time, calcium deposits accumulate inside the plastic button housing, causing the buttons to stick or bind.
- Misaligned Cistern Lid: If the heavy porcelain lid is nudged even slightly out of place, the flush buttons will not align vertically with the internal actuator rods, preventing them from depressing fully.
- Worn Flush Valve Seals: The rubber seal at the base of the flush tower naturally degrades over time due to exposure to municipal water treatment chemicals. In fact, these seals degrade at a rate of about 3% per year under normal use. If your toilet is 10 to 15 years old, that seal is roughly 30% to 45% less effective than when it was new, often causing water to leak continuously into the bowl.
- Incorrect Rod or Cable Tension: If the plastic rods underneath the button are too long, they constantly press down on the flush valve, causing the toilet to run. If they are too short, they won't reach the valve, resulting in a button that does absolutely nothing.
How to Diagnose and Fix Toilet Flush Button Issues
Before buying replacement parts, we recommend running a quick visual and physical diagnostic test.
- Check the Lid Alignment: First, look closely at the cistern lid. Is it sitting perfectly flush on the porcelain tank? If it is crooked, gently lift and reposition it.
- Test the Button Movement: Press each button individually. Do they feel stiff, or do they sink into the housing without springing back up? If they feel gritty or stiff, mineral deposits are the likely cause.
- Inspect the Water Level: Remove the cistern lid carefully. The water level should sit approximately 1 inch (2.5cm) below the vertical overflow tube. If the water level is too low, the toilet won't create enough suction for a strong flush. If it's too high, water will constantly spill into the overflow tube.
- Perform a Silent Leak Test: If you suspect a slow leak is causing your toilet to run, add a few drops of food coloring to the tank water. Wait 15 minutes without flushing. If the water in the toilet bowl changes color, you have a leaking flush valve seal.
For more detailed troubleshooting pointers, you can check out Toiletology's troubleshooting tips to help pin down the exact mechanical failure before you begin repairs.
Essential Tools to Fix Toilet Flush Button Mechanisms
Attempting advanced toilet repairs without the proper tools causes additional damage in about 35% of cases. Fortunately, most flush button fixes only require basic household items.
Before you begin, gather the following tools:
| Tool | Purpose | Repair Level |
|---|---|---|
| White Vinegar | Dissolves mineral deposits and limescale on buttons | Basic |
| Old Toothbrush & Microfiber Cloth | Scrubs away grime and wipes down plastic components | Basic |
| Screwdriver (Flathead/Phillips) | Adjusts fill valve screws and removes retaining fasteners | Basic |
| Adjustable Wrench / Spanner | Loosens or tightens the cistern mounting bolts | Advanced |
| Hacksaw | Trims plastic actuator rods on universal replacement kits | Advanced |
| Food-Grade Silicone Grease | Lubricates sticky button stems (Never use WD-40!) | Advanced |
Step-by-Step Guide: How to Fix a Toilet Flush Button
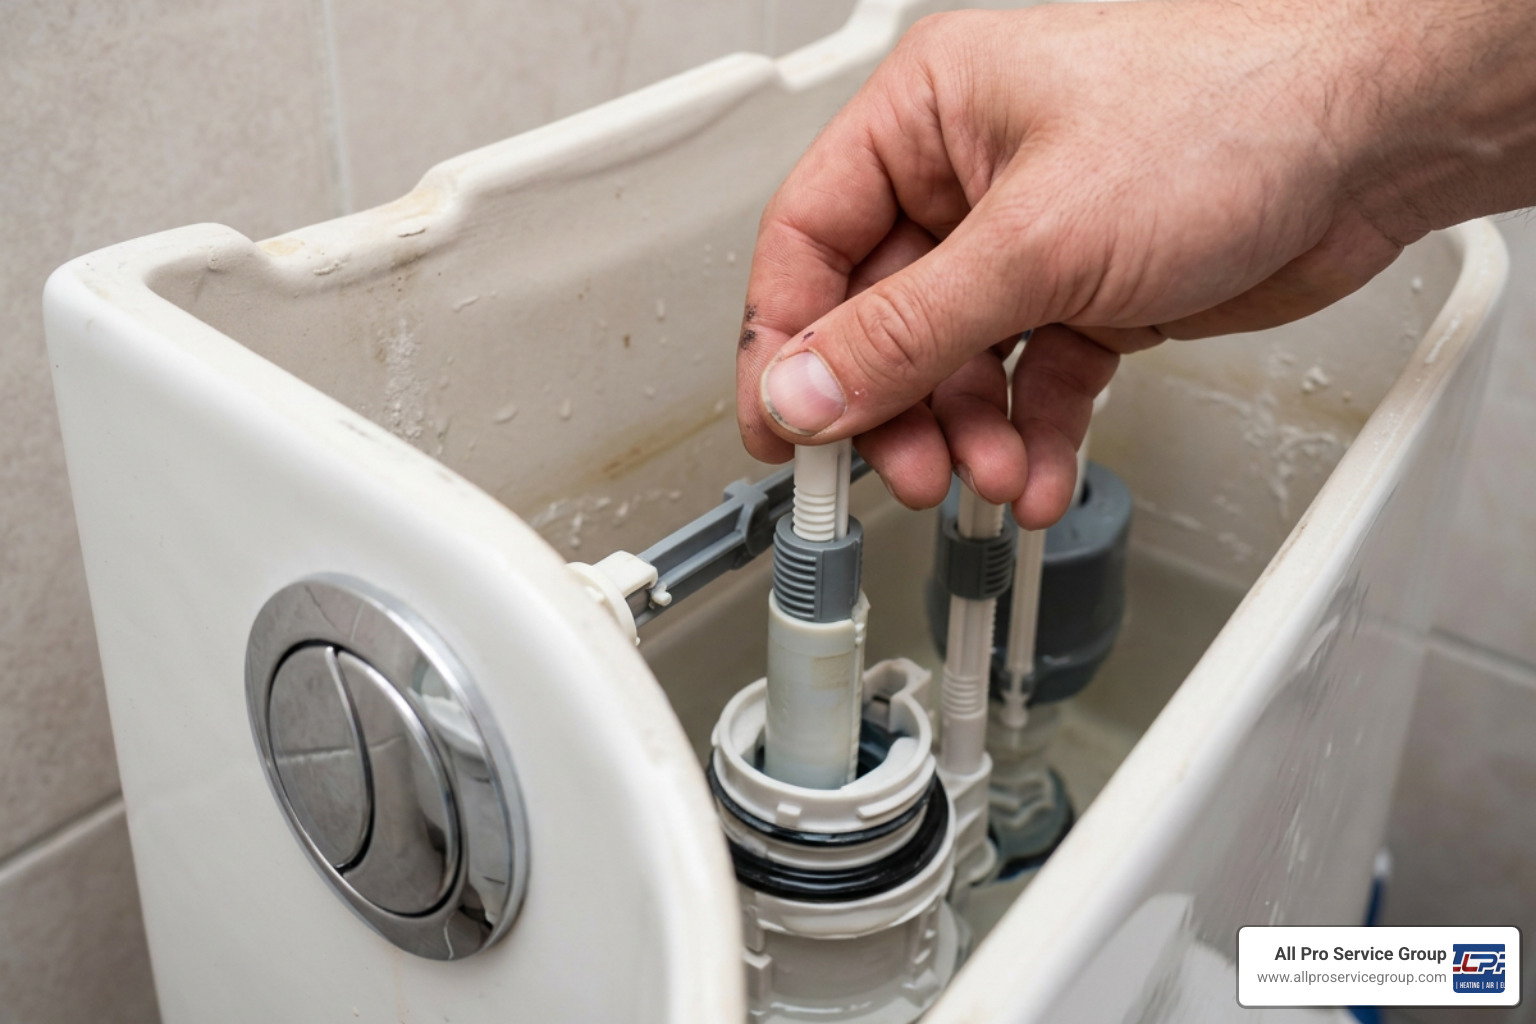
Ready to roll up your sleeves? Whether you are dealing with a button that is stuck, loose, or completely unresponsive, follow this step-by-step repair sequence.
First, let's prepare the workspace:
- Turn Off the Water Supply: Locate the chrome shut-off valve on the wall behind or beneath your toilet. Turn it fully clockwise until it stops.
- Drain the Cistern: Press and hold the flush button down to drain as much water as possible from the tank.
- Remove the Cistern Lid Safely: Carefully lift the lid straight up. Note: Some flush buttons are physically attached to the lid by a plastic retaining nut underneath. If yours is attached, raise the lid slightly, reach underneath, and unscrew the plastic retaining ring counterclockwise before fully removing the lid. Place the porcelain lid upside down on a soft towel on the floor to prevent it from chipping or cracking.
For a deeper look into the mechanical layout of these systems, you can also consult Engineer Fix's guide on push-button toilets.
How to Fix a Toilet Flush Button That Is Stuck Down
If your flush button remains depressed and won't spring back up, the issue is almost always a lack of spring tension caused by dirt, grime, or calcium buildup inside the housing.
- Step 1: Remove the Button Assembly. Unscrew the retaining ring on the underside of the lid to release the button housing from the porcelain.
- Step 2: Soak in Vinegar. Submerge the entire plastic button assembly in a bowl of warm white vinegar for 15 to 30 minutes. The mild acid will safely dissolve hard water minerals without damaging the chrome finish.
- Step 3: Scrub and Clean. Use an old toothbrush to gently scrub away any softened limescale or soap residue from the button edges and internal spring.
- Step 4: Lubricate the Stem. Apply a tiny dab of food-grade silicone grease to the moving plastic stems. This keeps the button sliding smoothly. Avoid standard household lubricants like WD-40, which can degrade plastic over time.
- Step 5: Reassemble and Test. Reinstall the button into the lid, hand-tighten the retaining nut, and test the spring action.
Adjusting the Actuator Rod or Cable
If your button moves freely but the toilet doesn't flush—or if it runs constantly—the connection between the button and the flush valve needs adjustment. Modern toilets use either rigid plastic push rods or flexible tension cables.
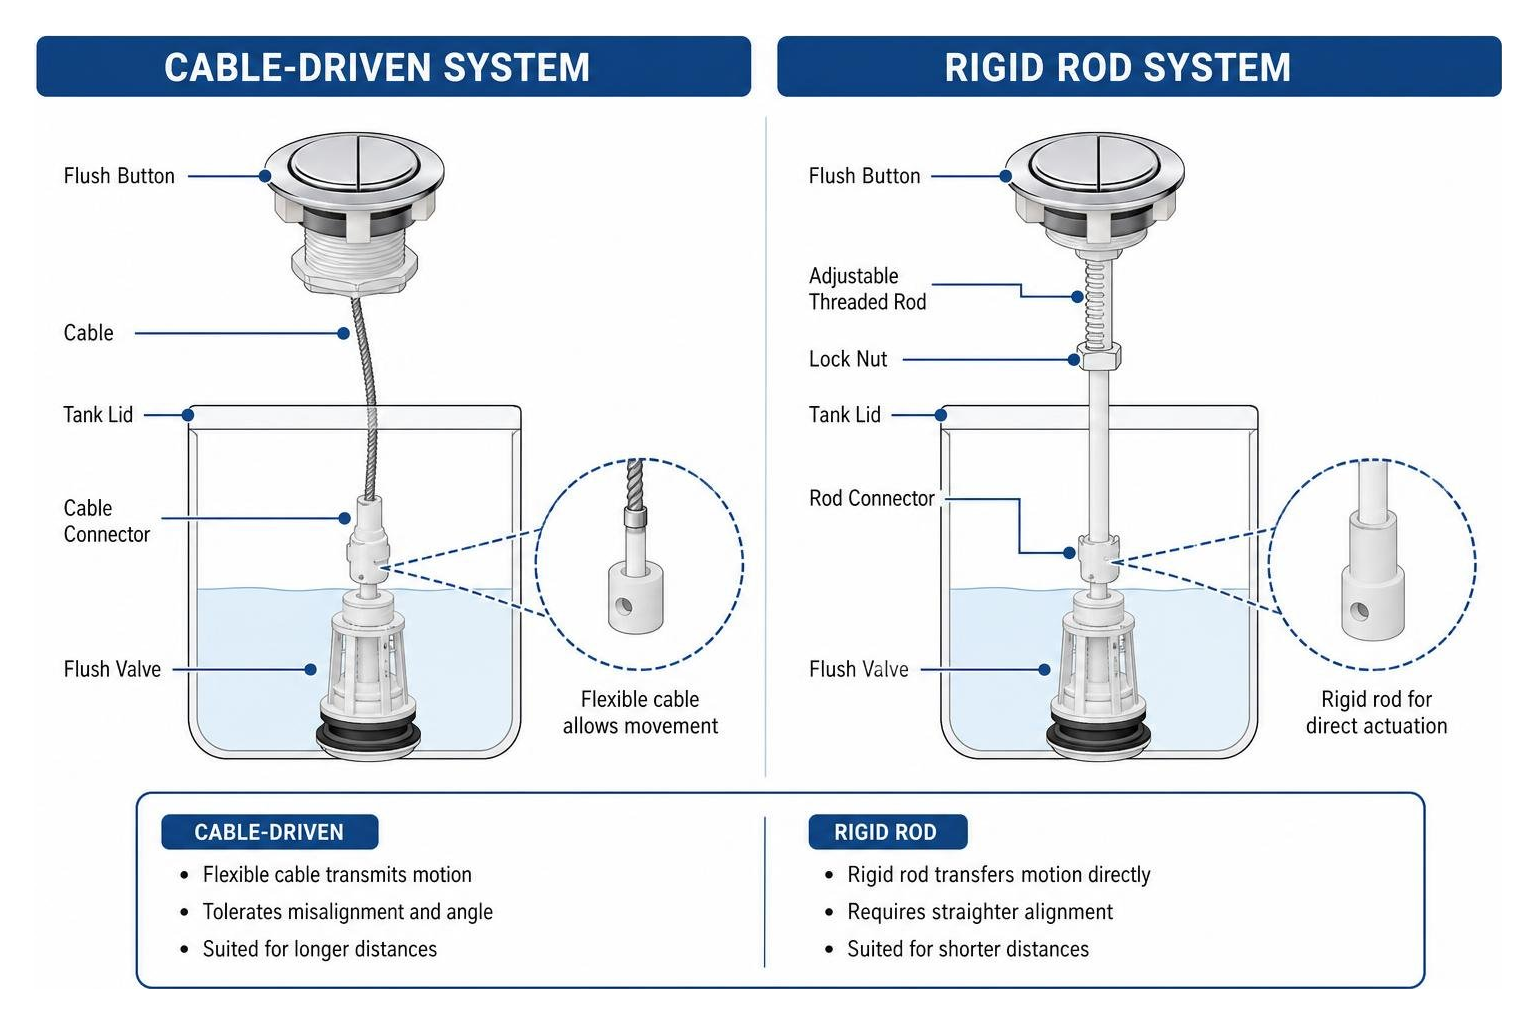
For Rigid Rod Systems:
- Too Long (Constant Running): If the rods are too long, they put constant downward pressure on the flush valve, lifting the seal and causing "phantom flushing." Screw the threaded rods upward (clockwise) to shorten them, leaving a tiny sliver of slack (about 1-2mm) between the rod tip and the valve.
- Too Short (Weak or No Flush): If the rods don't touch the valve, unscrew them (counterclockwise) to extend them until they sit just above the valve mechanism.
For Cable Systems:
- Inspect the flexible blue or green cable running from the button to the flush tower.
- If the cable has slipped out of its mounting bracket, snap the plastic clips back into their designated slots until you hear them click.
- Ensure the cable is taut but has a tiny amount of slack when the button is at rest so it doesn't accidentally lift the seal.
Replacing the Flush Valve and Button Assembly
If adjusting the rods and cleaning the button housing doesn't solve the issue, the internal flush valve or the button assembly itself may be physically cracked. In this case, a full component replacement is necessary.
This is a great opportunity to perform a complete changing toilet valve procedure, which restores your toilet's flushing power to brand-new condition.
- Purchase a Compatible Kit: Measure your buttonhole size before buying replacement parts. Most modern dual-flush toilets use standard buttonhole diameters of either 40mm or 60mm.
- Remove the Old Flush Valve: Most modern flush towers feature a bayonet-style mount. Simply grasp the central plastic tower and twist it counterclockwise. It should click and lift straight out of the base, allowing you to replace it without removing the entire tank.
- Replace the Seal: If you are keeping the tower but replacing the seal, peel the old rubber gasket off the bottom of the valve, clean the plastic seat with a damp cloth, and stretch the new seal into place.
- Install the New Button: Unscrew the old button assembly from the lid. Insert the new button through the top of the lid, thread the plastic retaining nut from underneath, and hand-tighten it securely.
- Reconnect and Calibrate: Twist the new flush valve tower clockwise into the tank base until it locks. Reconnect the cable or align the rods, turn the water supply back on, and run a few test flushes to ensure there are no leaks.
Fixing Flush Buttons on Back-to-Wall and Wall-Hung Toilets
Back-to-wall and wall-hung toilets look sleek, but because the cistern is concealed inside a wall unit or stud wall, repairing them can feel intimidating. Don't worry—you don't have to tear down your drywall to fix a broken flush button.
- Accessing the Cistern: Concealed cisterns are designed with maintenance in mind. The large flush plate on the wall acts as your access panel. To remove it, gently push the plate upward or downward to compress the hidden springs, then tilt the top edge forward to lift it off its mounting bracket.
- Troubleshooting Pneumatic Systems: Many wall-hung toilets use pneumatic (air-pressure) flush buttons rather than physical rods. When you press the button, a small pulse of air travels through a silicone hose to activate the bellows on the flush valve.
- Check the Air Hoses: If the button feels completely soft and does nothing, the most common cause is a disconnected air hose. Inspect the small silicone tubes behind the flush plate. If a hose has slipped off its nozzle, push it firmly back onto the plastic barb.
- Look for Kinks or Splits: Ensure the air hoses are not bent, pinched, or split. If a hose is cracked, you can trim the damaged end with scissors and reconnect the fresh, airtight section to the nozzle.
Frequently Asked Questions About Toilet Button Repairs
Why does my toilet keep running after pressing the button?
A running toilet is usually caused by one of two issues: an actuator rod that is adjusted too long (which constantly holds the flush valve slightly open), or a worn-out rubber flush valve seal. Because rubber seals degrade naturally at a rate of 3% per year, mineral deposits and age eventually prevent the seal from forming a watertight fit against the valve seat. Flapper and seal problems account for roughly 80% of all running toilet issues.
Can I replace just the button or do I need a new toilet?
You almost certainly do not need a new toilet! Replacing the flush button assembly or the internal flush valve is highly cost-effective and straightforward. A complete toilet replacement is only necessary if the porcelain tank or bowl is physically cracked, or if the fixture is extremely old and you want to upgrade to a more water-efficient model.
Is it safe to cut the plastic actuator rods on a replacement button?
Yes! Many universal or aftermarket replacement button kits feature extra-long plastic actuator rods designed to accommodate various tank depths. If you install the button and find that the rods are too long—preventing the lid from sitting flat—simply measure the excess length, mark it with a pencil, and use a small hacksaw to carefully cut the plastic rods down to the correct size.
Conclusion
Taking care of a broken toilet flush button is a fantastic, highly satisfying DIY project that can save you water, lower your utility bills, and prevent frustrating bathroom disruptions. Most of the time, a quick vinegar soak, a minor rod adjustment, or a simple seal replacement is all it takes to get your toilet flushing perfectly again.
However, we know that plumbing repairs don't always go according to plan. If you find yourself facing a stubborn concealed cistern behind a wall, a persistent leak that you can't seem to stop, or if you simply don't have the time or tools to tackle the job yourself, there is no shame in calling in the experts.
At All Pro Service Group, our trained, "Gephardt Approved" plumbing professionals have been serving homeowners in Salt Lake City, West Jordan, Provo, Ogden, Park City, and across the Greater Salt Lake Valley since 2008. We are always here to provide dependable, friendly, and expert service to get your home back in perfect working order.
If you need a helping hand with your toilet, water lines, or any other home system, contact us today to schedule a professional plumbing/plumbing repair visit!