
Stop a Leaky Toilet Before It Wastes Water
To repair a leaky toilet, first find where the water is escaping. A toilet that runs or refills on its own usually needs a flapper, chain, or fill-valve adjustment. Water on the outside may point to a loose supply line, tank bolts, or a failed wax ring at the base.
Start with these quick checks:
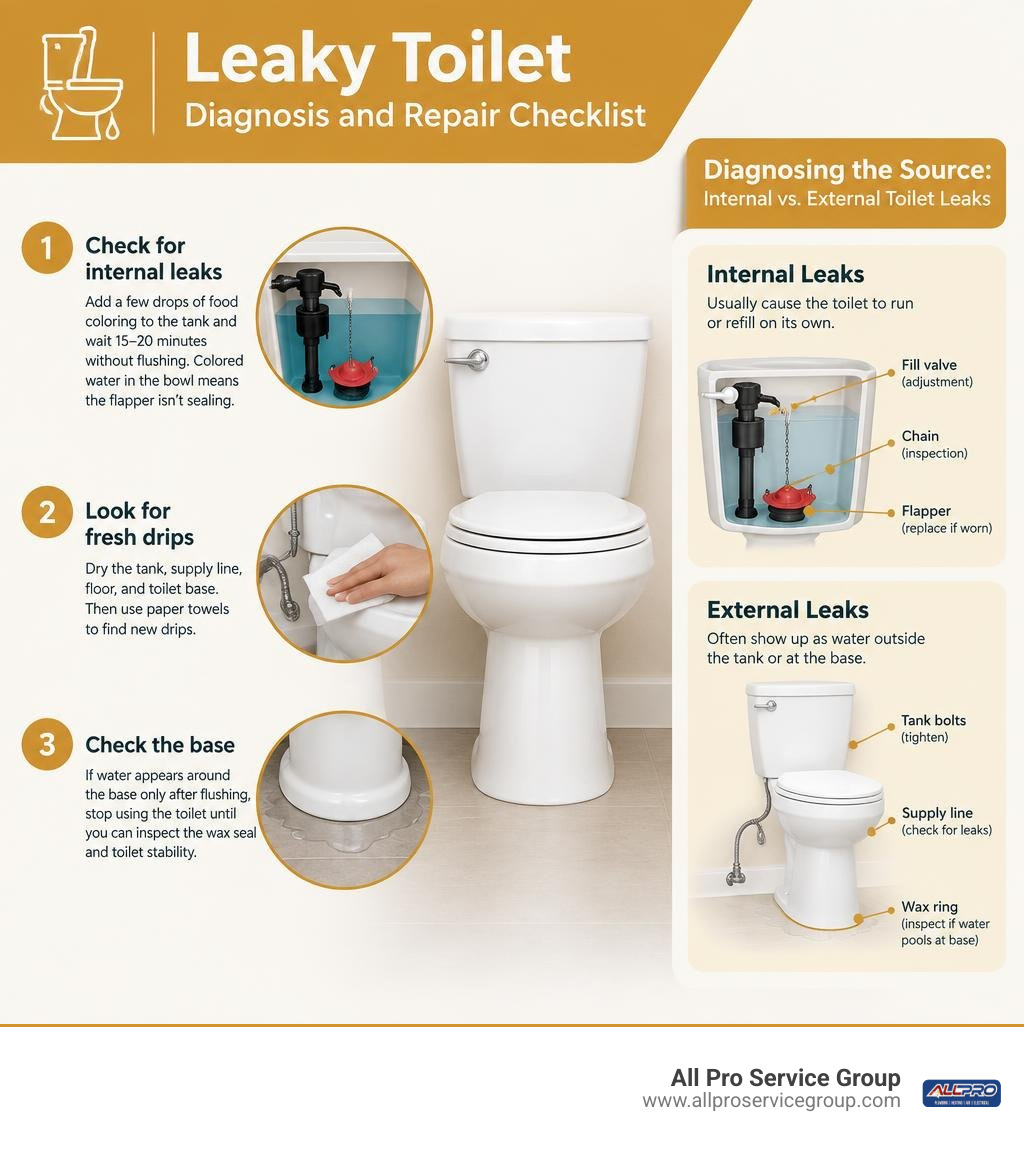
- Add a few drops of food coloring to the tank and wait 15 to 20 minutes without flushing. Colored water in the bowl means the flapper is not sealing.
- Dry the tank, supply line, floor, and toilet base. Then use paper towels to find fresh drips.
- If water appears around the base only after flushing, stop using the toilet until you can inspect the wax seal and toilet stability.
Even a quiet internal leak can waste a surprising amount of water. Acting early protects your water bill and helps prevent floor damage.
I am Gary Leany of All Pro Service Group. Since 2008, our Greater Salt Lake team has helped homeowners understand how to repair leaky toilet problems, from worn tank parts to leaks that need professional plumbing repair.
Diagnosing the Source: Internal vs. External Toilet Leaks
When a toilet starts leaking, finding the true origin of the moisture is half the battle. Broadly speaking, toilet leaks fall into two categories: internal leaks and external leaks.
An internal leak keeps water trapped inside the plumbing fixtures—flowing quietly from the upper tank down into the bowl and right down the sewer line. An external leak, on the other hand, escapes onto your bathroom floor, dampening subflooring, rotting baseboards, and creating puddles.
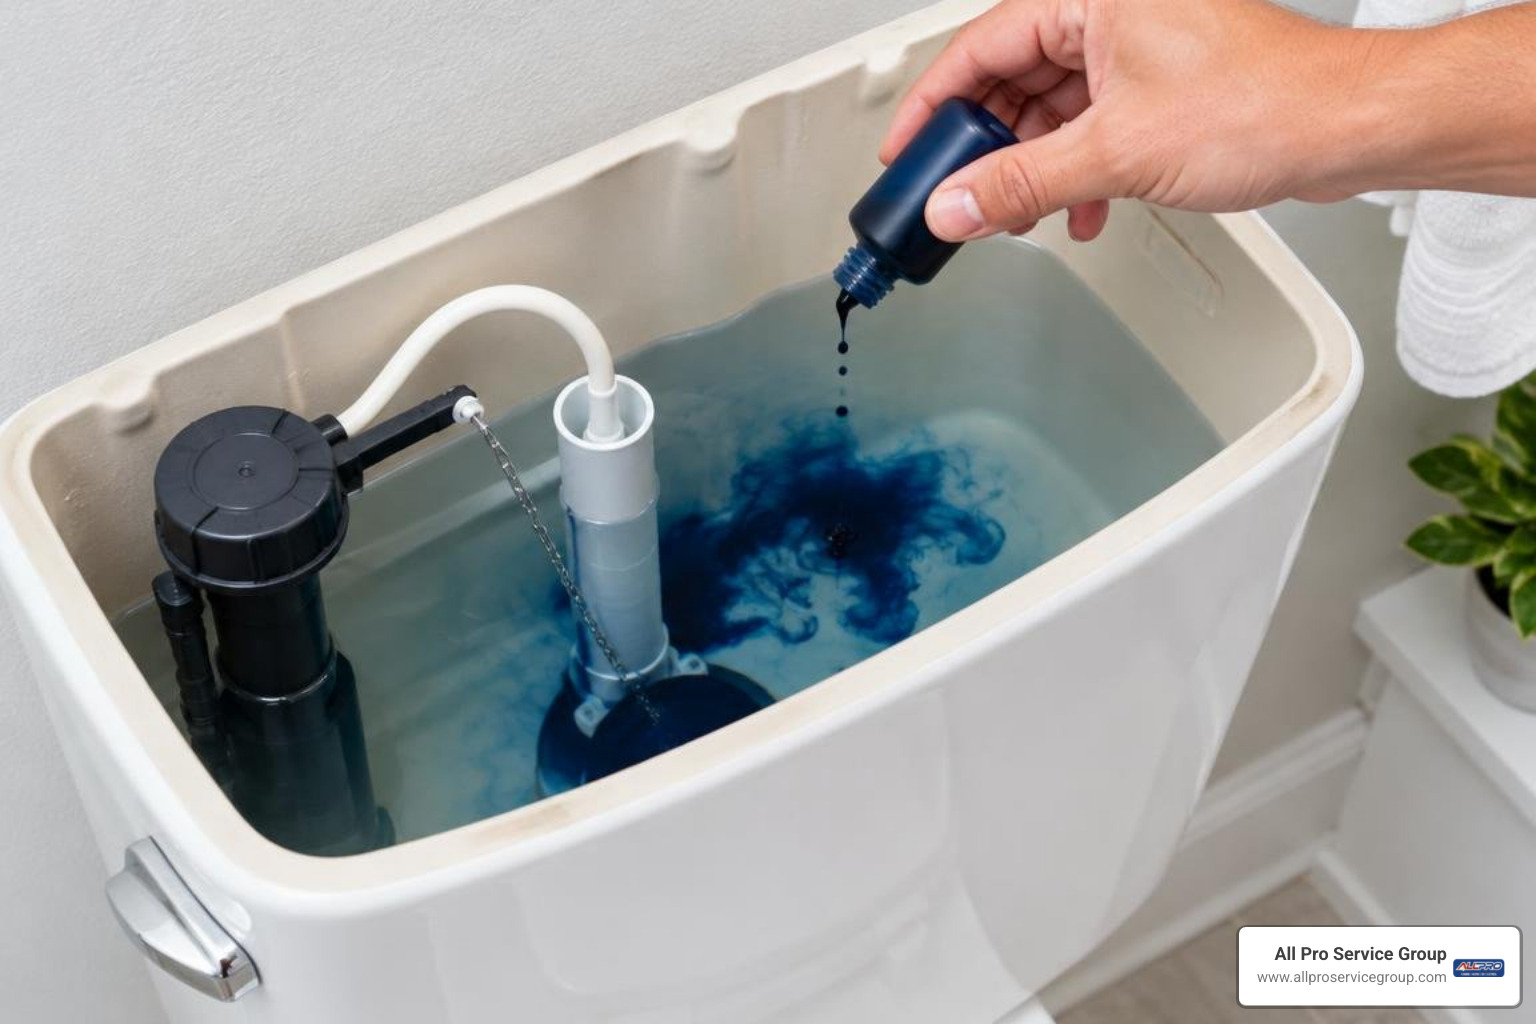
To accurately diagnose what type of issue you are dealing with, use two simple, low-tech diagnostic tests:
- The Food Coloring Test (Internal Diagnostic): Remove the tank lid and add 5 to 10 drops of dark food coloring or a dye tablet into the water. Do not flush. Wait 15 to 20 minutes. If the water in the bowl turns the color of your dye, water is leaking directly past your flapper or flush valve seat.
- The Paper Towel Test (External Diagnostic): Wipe down the entire outside of the toilet with a dry cloth—including the tank base, water supply line, shut-off valve, and the bottom base where porcelain meets tile. Wrap dry paper towels around the supply valve, under the tank bolts, and along the floor perimeter. Check back in 15 minutes to see precisely where moisture dampens the paper towel.
Be careful not to mistake tank condensation(sweating) for an active plumbing leak. During warm, humid months, cold fill water entering the tank cools the porcelain surface, causing moisture in the room air to condense and drip down the sides.
| Leak Type | Common Symptoms | Primary Causes | Typical Risk Level |
|---|---|---|---|
| Internal Leak | Ghost flushing, faint hissing, rippling bowl water, high water bills | Worn flapper, misaligned float, cracked overflow tube | High water waste; zero structural damage |
| External Tank Leak | Drips behind the bowl, puddles under tank bolts, damp supply line | Loose supply nut, degraded tank-to-bowl gasket, loose bolts | Moderate; can damage drywall and baseboards |
| External Base Leak | Water pooling on floor after flushing, sewage odor, rocking bowl | Failed wax ring, broken closet flange, loose closet bolts | Severe; causes hidden subfloor rot and structural decay |
Identifying Silent Internal Tank Leaks
Internal leaks are often referred to as "silent leaks" because they can go unnoticed for weeks or months while driving up utility costs. The most frequent sign is ghost flushing —that eerie sound when your toilet suddenly refills for three seconds in the middle of the night without anyone touching the handle.
This happens because water slowly trickles from the tank into the bowl. Once the water level in the tank drops below a certain threshold, the float drops, triggering the fill valve to turn on and top off the tank.
A continuous hissing or whistling sound points to another internal problem: water continually spilling over into the overflow tube. If the float is set too high, or if the fill valve diaphragm is blocked by mineral buildup, the valve will never fully shut off. For an exhaustive walkthrough on handling tank mechanics, refer to our comprehensive toilet repair complete guide.
Locating External Leaks at the Base and Supply Line
External leaks pose an immediate threat to your home's flooring, joists, and ceilings below. If you notice puddle formation around the porcelain base on the floor, examine when the water appears:
- If water appears only right after a flush, the culprit is almost certainly a deteriorated wax ring or a broken closet flange under the commode. You can explore targeted fixes for a commode leaking around base to understand how subfloor moisture behaves.
- If water is constantly pooling, inspect the flexible braided supply line and the shut-off valve behind the toilet. Metal and plastic supply nuts can crack or loosen over time, sending a steady trickle down the line to pool at the base of your commode.
Essential Tools and How to Repair Leaky Toilet Components
Before tackling any toilet repairs, gather the proper tools and materials. Most internal and external toilet repairs require only basic hand tools that you likely already keep in your toolbox.

Required Tools and Materials Checklist
- Adjustable crescent wrench(for supply line and tank bolts)
- Channel-lock pliers(for larger locking nuts)
- Flathead and Phillips screwdrivers
- Putty knife(essential for scraping old wax seals)
- Small bucket, sponge, and old towels(for soaking up residual tank water)
- Replacement toilet flapper(2-inch or 3-inch, depending on flush valve size)
- Universal fill valve assembly kit
- Tank-to-bowl gasket and rubber washer kit
- New wax ring(or non-wax foam gasket) with new brass closet bolts
- Plastic toilet shims(if fixing a rocking commode)
How to Repair Leaky Toilet Flappers and Flush Valves
Flapper failure accounts for approximately 70% to 90% of all residential toilet leaks. Because flappers stay submerged in water constantly, standard rubber degrades, stiffens, or accumulates mineral crust within 3 to 5 years.

When the flapper loses its flexibility, it can no longer create a watertight seal over the flush valve seat. As outlined in helpful resources like How to Fix a Leaking Toilet - This Old House, restoring this seal is one of the most cost-effective DIY plumbing fixes available.
Step-by-Step Flapper Replacement:
- Shut Off the Water: Turn the oval shut-off valve located on the wall behind the toilet clockwise until tight.
- Drain the Tank: Flush the toilet and hold the handle down to evacuate as much water as possible. Use a sponge and bucket to soak up the remaining puddle at the bottom of the tank.
- Unhook the Old Flapper: Unhook the lift chain from the flush lever arm, then unclip the rubber ears of the flapper from the pegs on the side of the overflow tube.
- Clean the Valve Seat: Mineral deposits, algae, or sediment can build up on the lip of the flush valve. Use a damp cloth or a non-abrasive scouring pad to buff the plastic or brass rim completely smooth.
- Install the New Flapper: Snap the hinges of your new flapper over the overflow tube mounting pegs.
- Adjust the Chain Slack: Connect the chain to the flush lever arm. Ensure there is approximately ½ inch of slack in the chain. If the chain is too tight, it will pull the flapper open and cause constant running; if it is too loose, the chain can get caught beneath the flapper when dropped, breaking the seal. Consult our flush seal replacement guide for specialized valve models.
How to Repair Leaky Toilet Fill Valves and Water Levels
If your toilet hisses relentlessly or the food coloring test proves the flapper is fine, your fill valve (ballcock assembly) likely needs adjustment or replacement. The fill valve controls the refill of water into the tank after a flush. If set incorrectly, water rises above the overflow tube and drains out endlessly.
Adjusting the Water Level
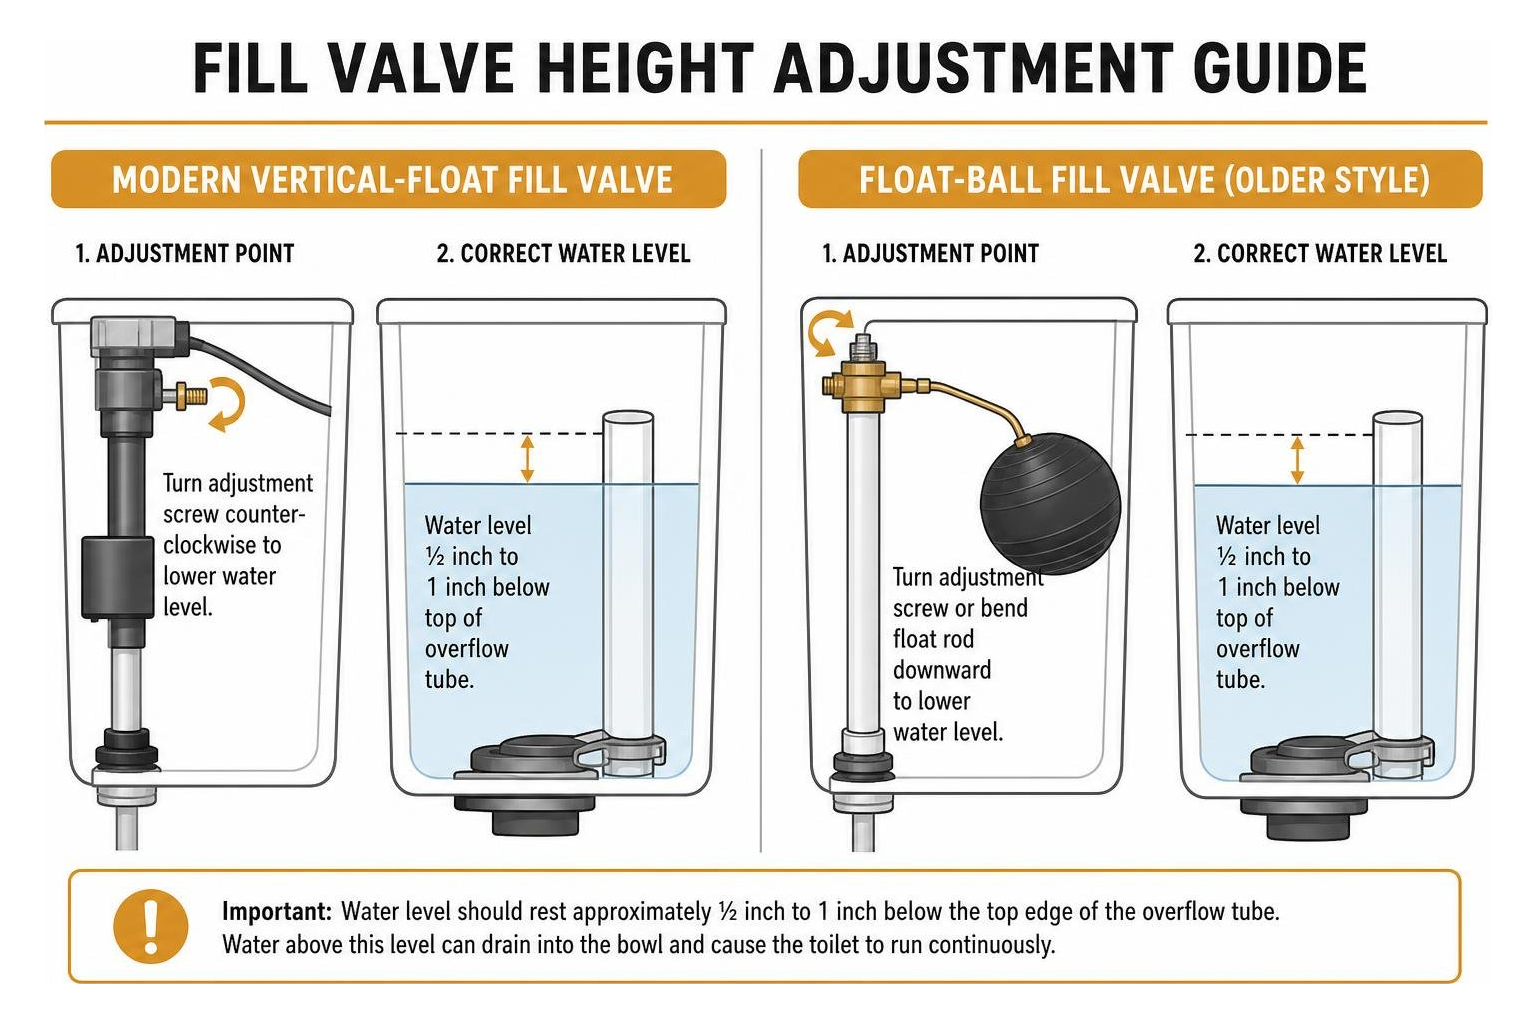
Take a look at the overflow tube inside your tank. The water line should rest approximately ½ inch to 1 inch below the top edge of the overflow tube.
- On modern vertical-float fill valves, locate the plastic adjustment screw on the side of the float arm. Turn the screw counter-clockwise using a screwdriver or your fingers to lower the water level.
- On older float-ball styles, gently bend the brass float rod downward or turn the adjustment screw at the top base of the valve.
Replacing a Faulty Fill Valve
When internal diaphragms or seals wear out due to hard water, adjusting the float will not stop the leak. In these instances, changing toilet valve components entirely is the smartest route:
- Turn off the water supply and thoroughly sponge out the tank.
- Place a small bucket beneath the supply line entry on the bottom left exterior of the tank.
- Unscrew the water supply coupling nut from the base of the fill valve shank using an adjustable wrench.
- Unscrew the plastic mounting locknut securing the fill valve to the bottom of the porcelain tank.
- Lift the old fill valve out of the tank.
- Adjust the height of your new universal fill valve so that the critical level mark (marked on the valve body) sits at least 1 inch above the top of the overflow pipe.
- Insert the new valve through the tank hole with the rubber shank washer seated snugly against the inside porcelain floor. Thread and tighten the locknut by hand underneath, adding a snug quarter-turn with pliers— do not overtighten, which can crack the porcelain.
- Clip the small rubber refill tube into the top opening of the overflow pipe.
- Reconnect the supply line, turn the water back on, and inspect for leaks while adjusting the final water level.
Replacing the Wax Ring Seal and Stabilizing a Rocking Toilet
A leak originating from the bottom edge of the toilet where it meets the bathroom floor is a serious issue that demands immediate action. The seal between the bottom horn of your toilet and the drainage pipe flange in your floor is maintained by a thick wax ring (or modern elastomeric foam gasket).
If the closet bolts loosen or the commode rocks when someone sits down, that wax seal distorts, breaks, and cannot heal itself. As highlighted by How to Fix a Leaking Toilet - Seal and Flange Leaks, letting base leaks go unresolved will lead to rotted subfloors and structural ceiling damage below.
Step-by-Step Wax Gasket Replacement
Replacing a failed wax ring requires lifting the commode off its base. While it takes some physical effort, following the correct sequence ensures a clean, watertight seal. Review the estimated cost to replace toilet seal if you prefer to weigh DIY effort against professional service.
- Shut Off and Evacuate Water: Turn off the wall shut-off valve. Flush the toilet and hold down the handle. Use a plunger to push excess water out of the bowl, then use a large car sponge to soak up all remaining water in both the tank and the bowl trap.
- Disconnect the Supply Line: Unscrew the flexible supply line from the bottom of the tank.
- Remove Closet Bolt Nuts: Pry off the decorative plastic caps at the base of the toilet on either side. Use an adjustable wrench to remove the nuts and washers from the closet bolts. If the bolts are rusted and spin in place, cut them using a mini-hacksaw.
- Lift the Toilet: Gently rock the toilet side to side to break the seal, then lift the toilet straight up with your legs. Set the toilet down onto old cardboard or towels to avoid scratching your bathroom tile.
- Clean the Flange and Horn: Stuff an old rag into the open drain pipe to block toxic sewer gases from entering your home. Use a stiff putty knife to scrape all traces of old, sticky wax off the floor flange and the underside discharge horn of the toilet bowl.
- Install New Closet Bolts: Slide new brass closet bolts into the side channels of the floor flange, using small plastic retainers to keep them standing upright.
- Set the New Wax Ring: Place the new wax ring (preferably one with an integrated rubber cone/funnel) directly onto the center of the clean floor flange—or press it firmly onto the bottom horn of the toilet.
- Reset the Toilet: Remove the rag from the drain pipe! Carefully align the holes in the toilet base over the protruding closet bolts and lower the toilet straight down.
- Compress the Seal: Sit on the toilet seat or apply firm, even downward body weight across the bowl to compress the wax ring evenly. Do not twist or rock the toilet once the wax touches down, as twisting ruins the seal.
- Fasten the Bolts: Thread the washers and nuts onto the closet bolts. Tighten them alternately—a little on the left side, then a little on the right side. Tighten only until snug. Overtightening will instantly crack the porcelain base.
Repairing a Damaged Flange and Leveling the Base
Before seating your new wax ring, inspect the condition of the closet flange. If the metal or PVC slots are cracked, broken, or corroded, new closet bolts cannot anchor the toilet down securely.
If you find damage, you can install a metal flange repair strap or split-ring repair kit directly over the broken section without cutting your drain pipes. See our in-depth guide on how to repair a broken toilet flange for detailed structural repair steps.
If your bathroom floor is uneven, the toilet may wobble even after the bolts are tightened. Never use excessive bolt tension to stop a wobble. Instead, slip thin plastic toilet shims underneath the low side of the porcelain base until the toilet sits completely rigid. Trim the shims flush with a utility knife, then apply a bead of tub-and-tile silicone caulk around the front and sides of the base, leaving a small 1-inch gap at the back so that any future wax seal failures remain visible rather than hidden beneath the floor.
When to Call a Professional Plumber
While most toilet leaks stem from simple parts that cost under $20 to replace, some plumbing scenarios present risks best handled by a licensed, equipped professional.
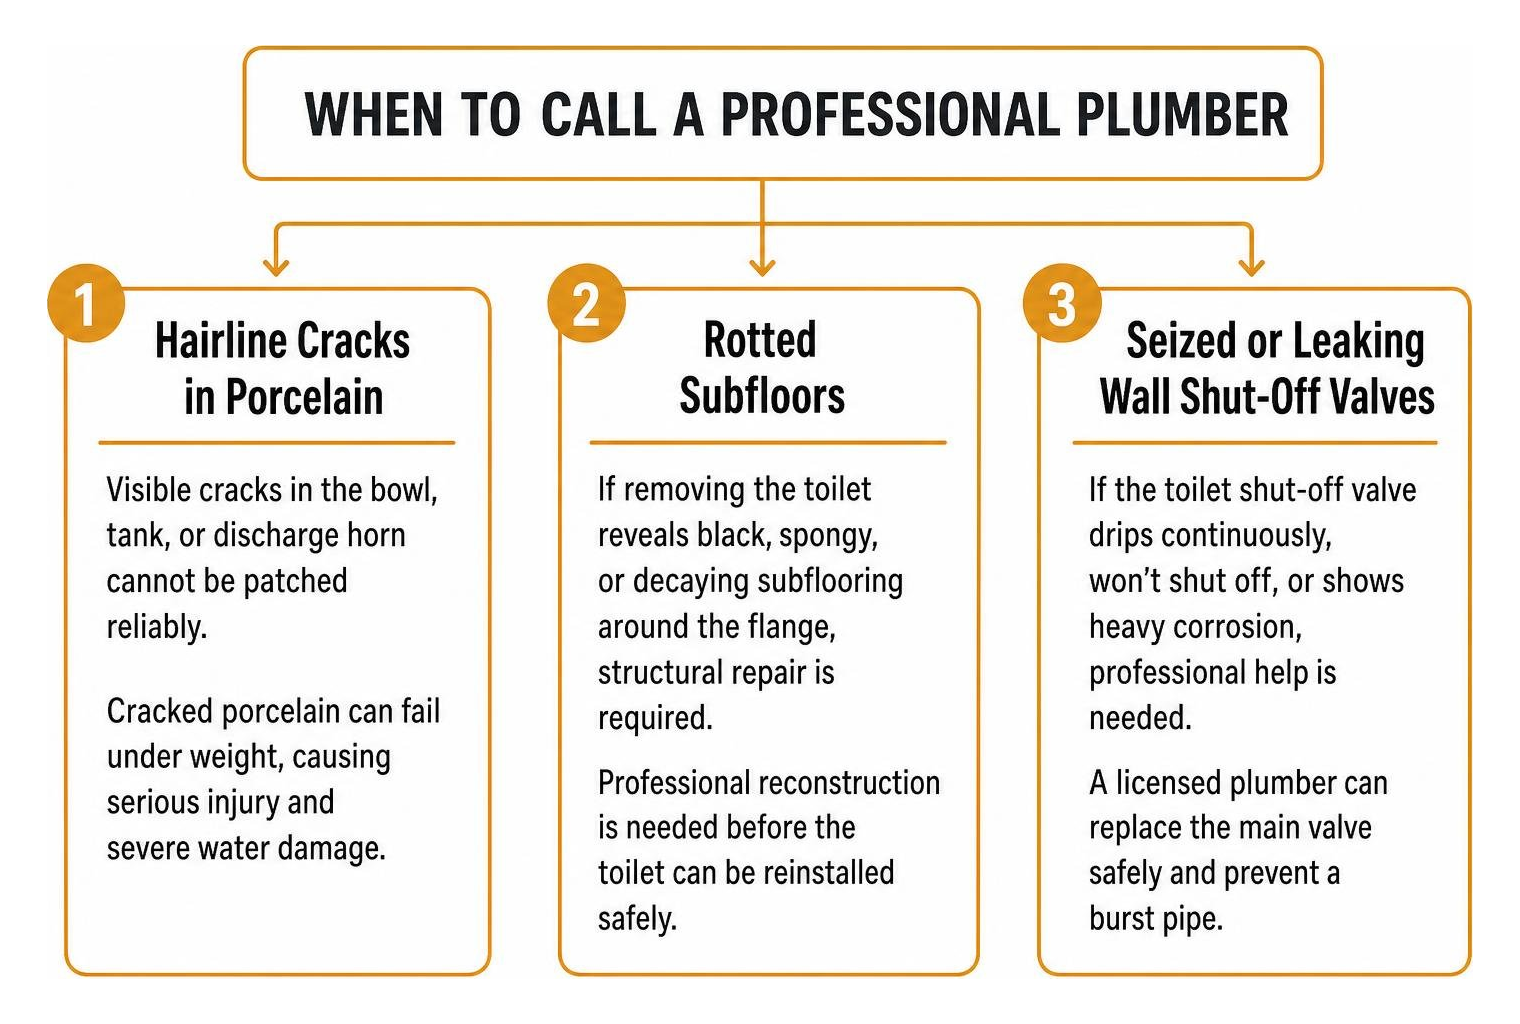
You should stop DIY efforts and schedule professional service in the following situations:
- Hairline Cracks in Porcelain: If you find a visible crack along the inner bowl, tank wall, or bottom discharge horn, the fixture cannot be patched reliably. Cracked porcelain can give way under weight, causing severe lacerations and devastating indoor floods.
- Rotted Subfloors: If removing the toilet reveals black, spongy, or decaying subflooring around the flange, structural woodworking and professional flange reconstruction are required before any toilet can be reinstalled safely.
- Seized or Leaking Wall Shut-Off Valves: If your home's main toilet angle-stop valve drips continuously, will not shut off water completely, or shows heavy mineral corrosion, you need professional intervention to replace the main valve safely without risking a burst supply pipe.
- Persistent Unresolved Leaks: If you have replaced the flapper, fill valve, and wax ring, but your commode continues to run, bubble, or leak at the floorline, the problem may point to main drain line venting problems or hidden slab leaks.
Our team at All Pro provides comprehensive plumbing leak detection and repair across Salt Lake City, Sandy, Ogden, and surrounding communities. If your fixture is reaching the end of its lifespan, check out our insights on when to repair vs replace your plumbing fixtures to determine whether a modern, high-efficiency model is your most economical long-term option.
Frequently Asked Questions About Leaky Toilet Repair
How much water does a leaking toilet waste each day?
A silently running toilet can waste anywhere from 30 to 200 gallons of water per day —and in severe cases with an open fill valve, up to 4,000 to 6,000 gallons per month. According to EPA water conservation data, a steady internal leak can add hundreds of dollars to your annual utility bill while placing unnecessary strain on municipal water systems.
Can drop-in bleach tablets cause toilet tank leaks?
Yes, absolutely. Drop-in chemical bleach and chlorine tablets continuously release highly concentrated corrosive oxidizers inside the enclosed tank. Within just 6 to 18 months, these chemicals break down rubber flappers, warp silicone seals, dissolve plastic fill valve stems, and corrode metal tank bolts. Most toilet manufacturers explicitly void their warranties if drop-in chemical tablets are used.
Why does my toilet keep leaking after installing a new flapper?
If your toilet continues to run after installing a brand-new flapper, check these three common issues:
- Pitted Flush Valve Seat: The rubber flapper may be fine, but the hard plastic or brass seat it seals against may be corroded, nicked, or coated in calcium scale, preventing a tight seal.
- Improper Chain Length: If the lift chain has zero slack, it pulls slightly upward on the flapper. If it has too much slack, links can slip under the flapper seal when flushed.
- Faulty Fill Valve Diaphragm: The leak may not be coming from the flapper at all. If the fill valve fails to shut off, water continuously climbs and spills over the top lip of the overflow tube.
Conclusion
A leaking toilet is more than an annoyance—it wastes clean water, drives up utility bills, and risks serious water damage to your subflooring if left unchecked. Fortunately, diagnosing whether you are dealing with an internal flapper issue or an external base seal failure requires only a few minutes and some household food coloring. With a handful of basic tools and the right replacement parts, most homeowners can resolve running water and minor leaks quickly and affordably.
If you encounter cracked porcelain, corroded supply shut-off valves, or persistent leaks that defy standard repairs, don't risk damaging your home. All Pro is here to deliver dependable, high-quality results. Contact our friendly technicians today to schedule our trusted professional plumbing repair services across the Greater Salt Lake Valley and get your bathroom running quietly, efficiently, and worry-free.