
Fix a Toilet Seal Leak Before It Damages the Floor
To fix toilet seal leaks, remove the toilet, replace the failed wax ring or wax-free gasket, inspect the floor flange, then reset and test the toilet. Water at the base after flushing, a sewer smell, or a toilet that rocks can point to a failed seal - and ignoring it can allow hidden moisture to damage the subfloor.
Quick answer:
- Shut off the water and drain the tank and bowl.
- Disconnect the supply line and remove the floor bolts.
- Lift the toilet, scrape away the old seal, and check the flange.
- Install a new, correctly sized seal and new closet bolts.
- Lower the toilet straight down, tighten evenly, and flush several times while checking the base with dry tissue.
This is usually a manageable budget repair when the flange and flooring are sound. But a cracked flange, soft floor, or repeated leak can turn a simple seal replacement into a larger plumbing and flooring issue.
All Pro Service Group has been serving Greater Salt Lake homeowners since 2008 with practical plumbing repairs and inspections. In the sections ahead, All Pro explains how to fix toilet seal problems safely, avoid common mistakes, and know when damage calls for professional help.
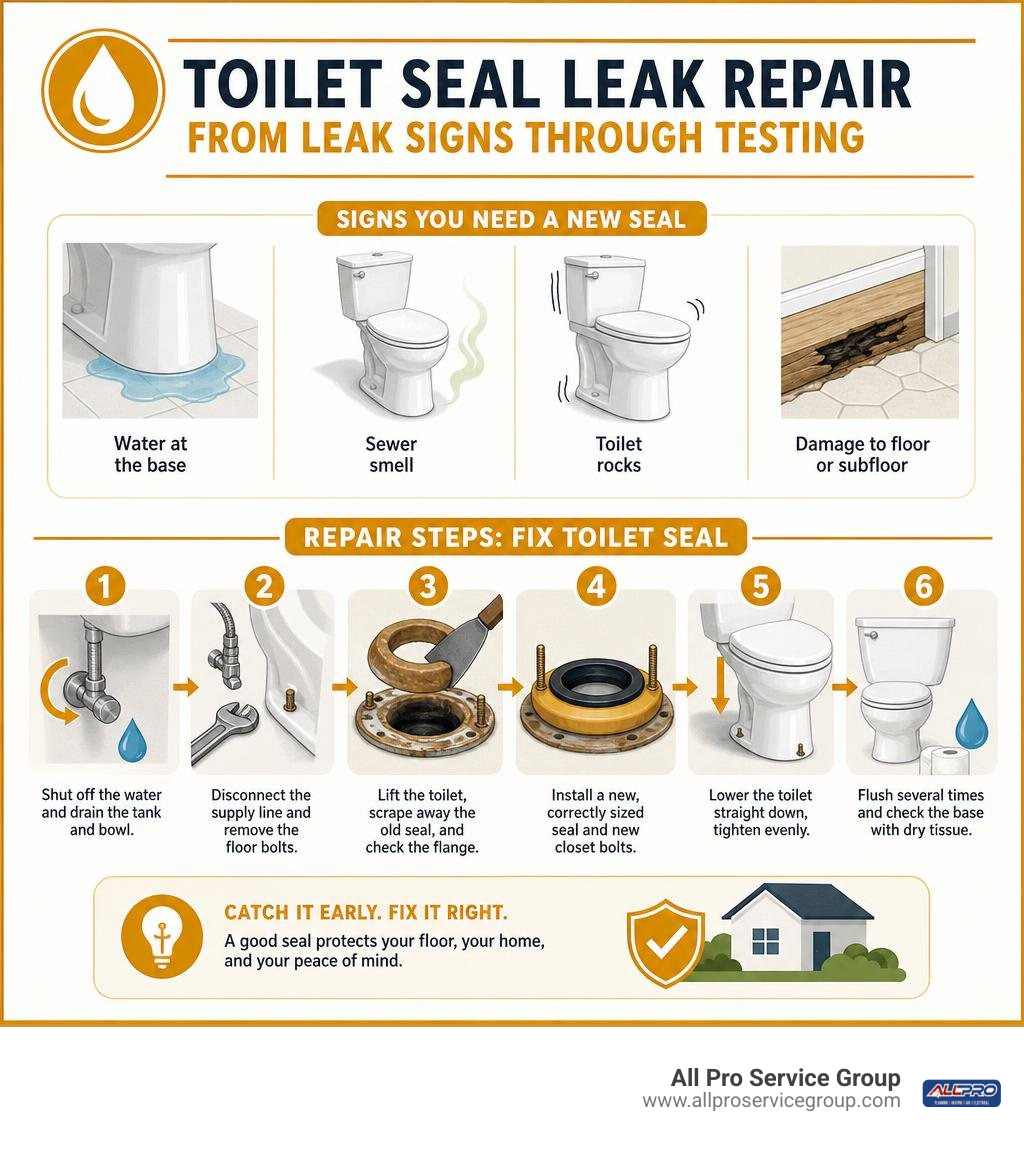
Signs You Need a New Toilet Gasket
When a toilet floor seal degrades, water isn't the only thing that escapes. A failed gasket compromises both the watertight and airtight barrier between your toilet base and the sewer drain line below. Identifying the early warning signs allows you to fix toilet seal issues before expensive subfloor structural rot sets in.
The most obvious warning indicator is water pooling on the floor around the base of the toilet after a flush. However, leaks do not always create noticeable puddles immediately. Other common signs include:
- Persistent Foul Sewer Smell: When the wax or rubber gasket breaks down, noxious sewer gas bypasses the trap and enters your bathroom.
- Unstable or Rocking Toilet: If the commode shifts side-to-side when you sit down, the physical movement breaks the seal, causing a commode leaking around base condition.
- Soft or Spongy Bathroom Subfloor: Vinyl, tile, or laminate flooring near the fixture may feel squishy underfoot due to water soaking into the wood underneath.
- Floor Discoloration and Mold: Dark stains along tile grout lines or mold colonies growing along the bottom rim of the porcelain indicate lingering moisture.
- Ceiling Stains Below: If the bathroom is on an upper floor, yellowish water spots on the drywall ceiling directly underneath point to a leaking floor seal.
How to Know When to Fix Toilet Seal Failure
Understanding how long a gasket lasts helps you evaluate whether it is time for a replacement. Under ideal conditions, a standard wax ring can last 20 to 30 years—essentially the lifespan of the toilet itself. However, several factors accelerate wax degradation:
- Toilet Movement: If the closet bolts loosen and allow the porcelain base to wobble, the malleable wax is crushed unevenly and cannot spring back into position.
- Subfloor Flexing: Rotting wood or loose floorboards cause the floor to shift under body weight, pulling the flange away from the toilet horn.
- Severe Drain Clogs: Backup pressure caused by main drain blockages can force wastewater backward through the base gasket.
- Unseating the Fixture: Anytime a toilet is unbolted and lifted for remodeling or retrieving a swallowed toy, the existing wax ring is permanently ruined and must be replaced.
If your toilet is over 15 to 20 years old and exhibiting any movement or odor, replacing the gasket is cheap insurance against catastrophic floor rot.
Diagnostic Tests for Leaks
Before tearing apart your plumbing, it helps to confirm that the water on the floor is actually coming from the bottom ring and not from a sweating tank, a loose fill valve, or a faulty tank-to-bowl gasket.

- The Food Coloring Test: Add 10 to 15 drops of dark food coloring into the toilet bowl (not the tank). Wait 15 minutes without flushing. If colored water appears on the floor around the base, the bowl porcelain itself may be cracked. Next, flush the toilet; if colored water seeps out around the floor joint immediately after the flush cycle, the floor seal has failed.
- The Dry Tissue Test: Wipe the entire toilet completely dry with paper towels. Wrap clean, dry tissue paper around the water supply line connection, under the tank bolts, and around the base. Flush the toilet. If the tissues on the supply line and tank remain bone dry while the tissue around the floor base gets soaked, you know you need to fix toilet seal gaskets at the floor level.
- Supply Line Check: Feel along the braided supply hose from the wall shut-off valve up to the fill valve shank. Leaks here often trickle down the back of the porcelain bowl, tricking homeowners into thinking the floor seal has gone bad.
Budget Tools and Materials Required
Fixing a leaky floor gasket is one of the most cost-effective DIY plumbing projects you can tackle. The parts cost very little, making it an ideal budget repair if you have a few basic hand tools on hand.
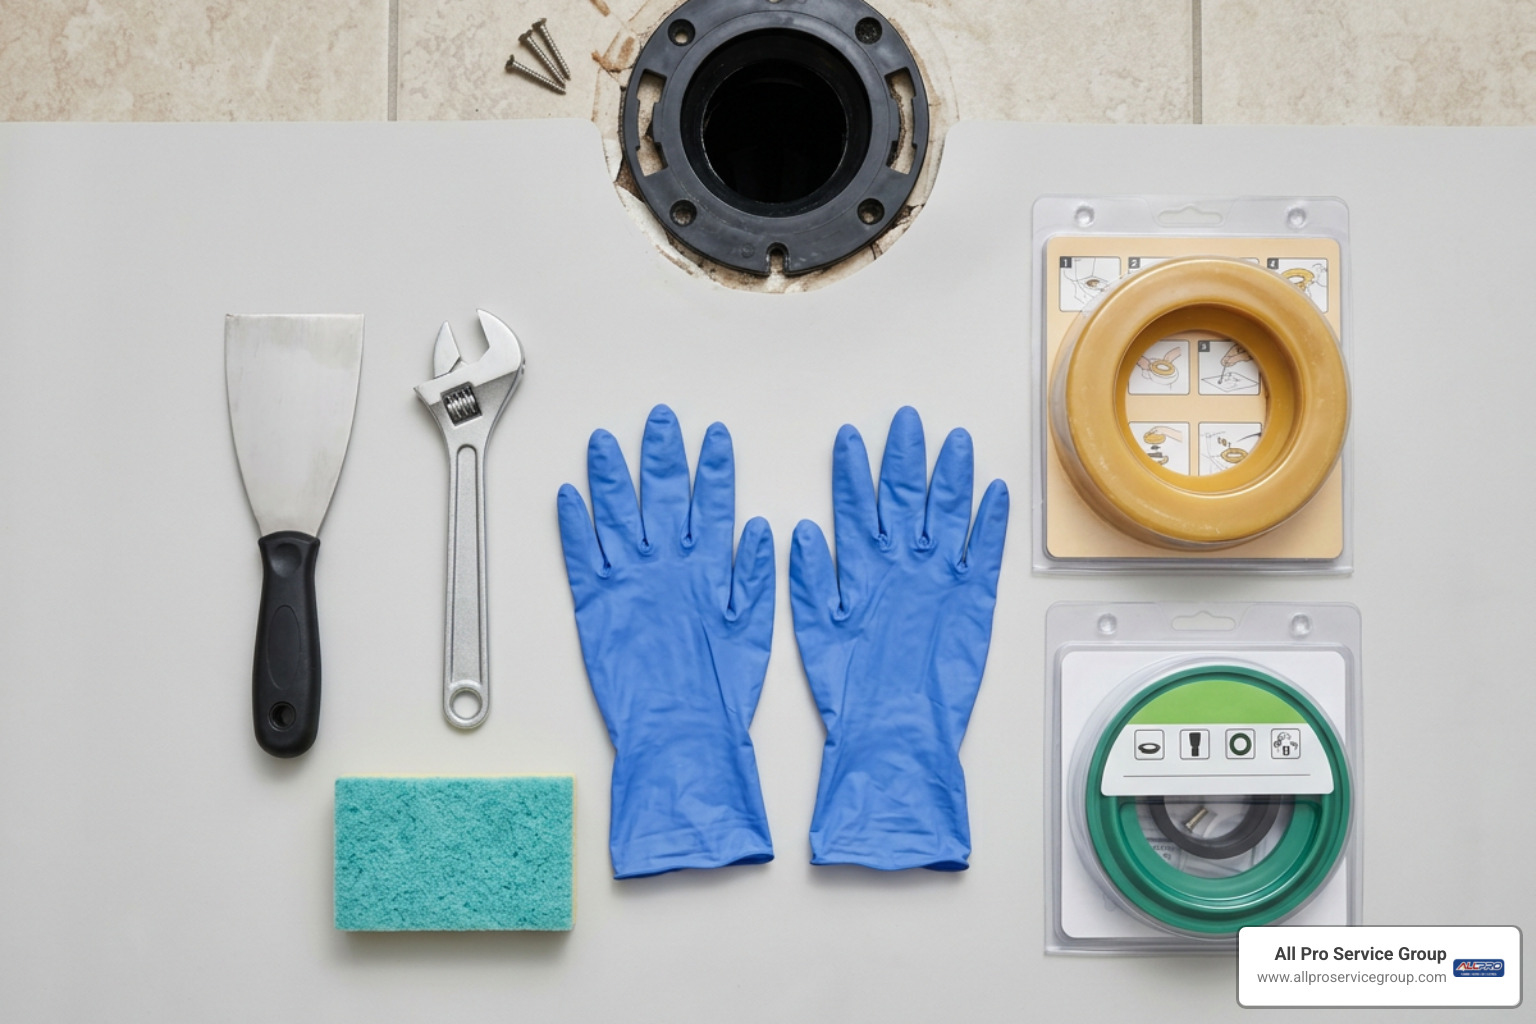
Here is the essential checklist of tools and supplies:
- Replacement Toilet Seal: Standard wax ring, jumbo wax ring, or a modern wax-free rubber seal.
- New Closet Bolts (T-Bolts): Solid brass or stainless steel 5/16-inch closet bolts with brass nuts and washers.
- Putty Knife: A stiff 1.5-inch or 2-inch plastic or metal scraper for removing old wax.
- Adjustable Wrench: For removing and tightening supply lines and floor nut fasteners.
- Sponge and Bucket: To evacuate residual standing water from the tank and bowl trap.
- Rubber Gloves and Cleaner: Disinfectant spray and heavy-duty nitrile gloves for sanitary handling.
- Old Towels or Cardboard: To lay the removed porcelain bowl on without scratching floor tiles.
- Rags or an Old Sock: To plug the open drain pipe and block sewer gas while you work.
Traditional Wax Rings vs. Wax-Free Toilet Seals
Choosing the right seal type is key to a smooth installation. While wax rings have been the industry standard for over a century, rubber and foam wax-free options have grown in popularity.
| Feature | Standard Wax Ring | Extra-Thick (Jumbo) Wax Ring | Wax-Free Rubber Seal |
|---|---|---|---|
| Average Cost | $3 - $6 | $5 - $8 | $10 - $15 |
| Material | Molded petroleum wax | Petroleum wax with urethane foam core | Synthetic rubber / silicone |
| Repositioning | No (Single-use compression) | No (Single-use compression) | Yes (Can lift and realign) |
| Ideal Flange Position | Above or flush with floor | 1/4 inch below finished floor | Above, flush, or below floor |
| Temperature Limits | Can melt in extreme heat | Can melt in extreme heat | Unaffected by temperature |
| Mess Level | High (Sticky wax residue) | High (Sticky wax residue) | Clean and hands-free |
Traditional wax rings rely on soft, compressed wax to create a custom watertight mold between the toilet horn and the closet flange. They are inexpensive and highly reliable—provided you drop the toilet down perfectly on the first try. However, if you drop the toilet crooked and need to lift it back up, the wax ring is ruined and cannot be reused.
Modern alternatives, such as a wax-free seal kit, utilize flexible rubber collars or foam rings. These allow you to lift, adjust, and reset the toilet multiple times without purchasing a new seal. They also handle flanges that sit slightly below floor height much better than standard wax.
Step-by-Step Guide to Fix Toilet Seal Leaks
Working with heavy porcelain requires patience and deliberate moves. Toilets generally weigh between 70 and 120 pounds, so take your time and get help lifting if necessary.
Draining and Disconnecting the Toilet
- Shut Off the Freshwater Line: Locate the oval shut-off stop valve behind the toilet. Turn the handle clockwise until it stops tight. If you have a quarter-turn valve, turn it 90 degrees until the handle is perpendicular to the pipe.
- Flush the Toilet: Hold down the flush lever until the tank drains completely.
- Evacuate Standing Water: Water will remain in the bottom of the tank and inside the bowl's built-in S-trap. Bail out the bowl water using a small cup, then soak up the remaining moisture in both the tank and bowl using a large sponge, wringing it out into a bucket. You can also use a wet/dry shop vacuum.
- Disconnect the Water Supply Hose: Place a small towel beneath the fill valve connection under the tank. Use an adjustable wrench to loosen the coupling nut on the flexible line, turning counterclockwise.
- Remove Floor Bolt Fasteners: Pop off the plastic decorative bolt caps at the base of the toilet using a flathead screwdriver. Use an adjustable wrench or socket to unscrew the mounting nuts from the closet bolts. If the bolts are rusted solid and spin in place, apply penetrating oil or cut through them beneath the washer using a small mini-hacksaw blade.
Removing Old Wax and Inspecting the Flange
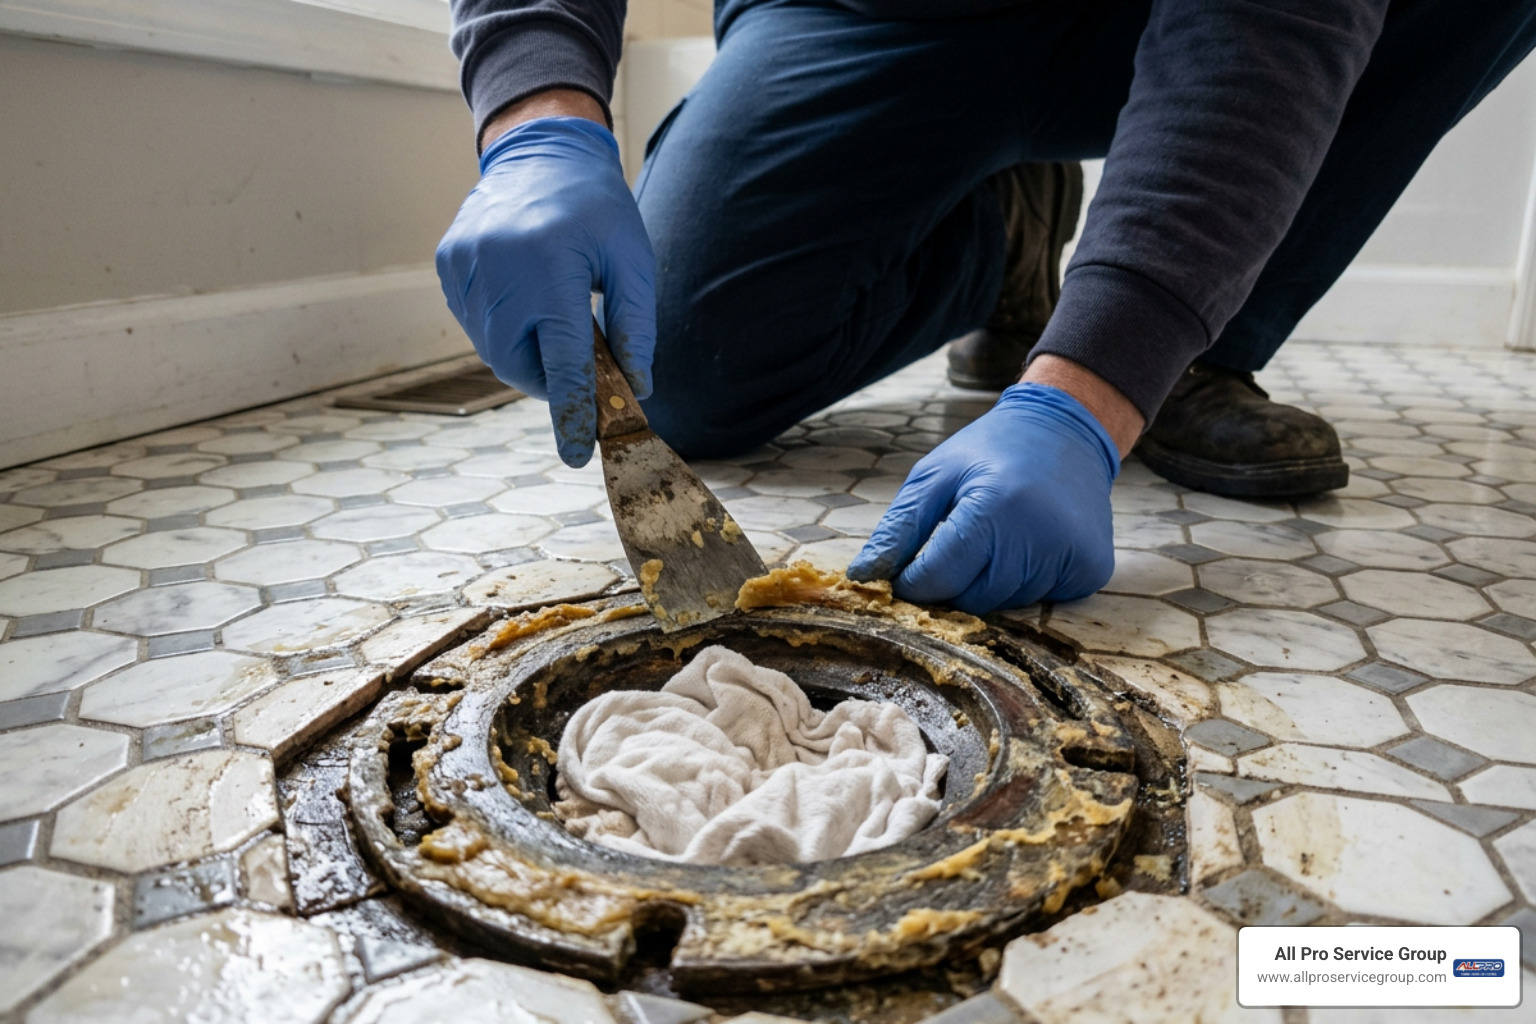
- Break the Old Seal: Gently rock the toilet bowl side-to-side to break the stickiness of the old wax gasket.
- Lift and Set Aside: Lift the toilet straight up by the bowl rim—keeping your back straight and lifting with your legs—and immediately transfer it onto a piece of thick cardboard or old blankets. Never set raw porcelain directly down on hard ceramic tile, as it can easily chip or crack.
- Plug the Open Sewer Drain: Stuff a large wadded rag, towel, or an old ball of socks directly into the open 3-inch or 4-inch floor pipe. This blocks toxic, highly flammable sewer gases from entering your home and prevents nuts or tools from accidentally falling down the drain.
- Scrape Off Old Wax: Use a plastic or stiff metal putty knife to scrape away all remaining sticky wax from both the floor flange and the funnel-shaped porcelain horn on the underside of the toilet bowl. Wipe the surfaces thoroughly clean with paper towels and a grease-cutting household cleaner.
- Inspect the Closet Flange: Examine the plastic, cast iron, or brass flange securely screwed into your floor. Look closely for cracks, broken bolt slots, or missing mounting screws. Check whether the subfloor wood surrounding the flange is solid or soft from moisture.
Installing the New Seal and Reseating the Toilet
Whether following basic DIY practices or a detailed step-by-step toilet seal guide, precision during placement is critical.

- Install New Closet Bolts: Slide the head of each new brass closet bolt into the wide slots on the left and right sides of the flange, spinning them so the flat sides align parallel to the wall behind the toilet. Thread small plastic retainer washers down onto the bolts to keep them standing straight up and wobble-free.
- Position the New Seal:
- If using a wax ring: Press the flat face of the wax ring firmly over the floor flange, centering the plastic horn (if equipped) facing down into the drain pipe. Alternatively, press the wax ring firmly onto the bottom porcelain horn of the toilet.
- If using a wax-free seal: Place the rubber gasket or foam ring directly over the floor flange according to the manufacturer's directions, ensuring it centers evenly over the bolt holes.
- Lower the Toilet Straight Down: Remove the sewer gas plug rag from the open drain! With a helper guiding you, lift the toilet bowl and position it above the flange. Align the mounting holes in the porcelain base directly over the upright closet bolts. Lower the bowl straight down without letting it tilt or twist.
Preparing the Base to Fix Toilet Seal Alignment
- Compress the Gasket: Once the bowl contacts the seal, sit gently on the center of the toilet seat or apply firm, steady downward body weight directly over the bowl. Press down evenly until the porcelain base rests flat against the finished floor. Crucial Rule: Never twist, rotate, or rock the toilet side-to-side once it contacts a traditional wax ring, or you will crush the wax unevenly and break the airtight bond.
- Install Washers and Nuts: Slip the plastic cap washers (marked "THIS SIDE UP") onto the bolts, followed by the metal washers and brass nuts.
- Tighten Nuts Alternating Sides: Hand-tighten both nuts first. Then, using your wrench, give the left nut a half-turn, then the right nut a half-turn. Alternate back and forth to draw the toilet down levelly.
- Do Not Overtighten: Tighten the nuts until they are snug and the bowl no longer shifts when nudged. Stop immediately once snug. Overtightening will snap the fragile porcelain base, turning a simple repair into a broken toilet scenario requiring a brand-new fixture.
- Trim Excess Bolt Length: If the brass bolts stick up too high for the plastic decorative caps to snap on, trim off the excess threads using a hacksaw, then snap the caps into place.
- Reconnect Water Line: Reattach the flexible braided water line to the threaded fill valve shank hand-tight, plus a quarter-turn with a wrench.
Testing the New Seal for Leaks
- Restore Water Supply: Slowly open the shut-off valve counterclockwise, allowing the tank to fill completely while checking all line connections for drips.
- Perform Initial Flush Test: Flush the toilet while watching the floor joint closely.
- The Dry Paper Towel Check: Lay dry paper towels or tissue paper completely around the base of the toilet where the porcelain meets the floor tiles.
- Multiple Test Flushes: Flush the commode 4 to 5 times in a row. Press down firmly on the paper towels to inspect for tiny moisture spots or hidden trickles.
- Check Back in 24 Hours: Keep the floor dry and check the tissues again after a full day of normal household use to verify the seal remains completely watertight.
Handling Damaged Flanges and Low Floor Heights
A simple gasket replacement can hit a snag if you discover that the closet flange underneath is broken, rusted out, or sitting at the wrong height.
When bathrooms undergo flooring upgrades—such as laying thick modern porcelain tile over old vinyl sheet flooring—the finished floor height rises. This leaves the original closet flange sitting deep inside a recessed pocket below floor level.
If a flange sits more than 1/4 inch below the finished floor line, a standard wax ring will not compress enough to create a reliable seal, leading to immediate leaks.

Here is how to solve common flange structural problems on a budget:
- Recessed / Low Flanges: Never stack two standard wax rings together; double-stacked wax rings compress unevenly and frequently fail. Instead, install a solid plastic flange extender kit stacked on top of the original flange with silicone sealant, or use an extra-thick "jumbo" wax ring equipped with a rubber sleeve.
- Cracked or Broken Bolt Slots: If the side slots on a plastic or cast-iron flange have snapped off—preventing the closet bolts from holding tight—you do not need to cut out the entire pipe. Screw a metal flange repair strap or split-ring repair plate directly over the existing flange into the subfloor. These cost under $15 and restore structural strength in minutes.
- Rotted Wood Subfloor: If water has leaked so long that the screws holding the flange to the wooden subfloor have pulled loose through rotted wood, stop the project. The damaged wood must be cut out and reinforced with clean plywood before a toilet can be anchored safely.
Should You Caulk Around the Base of the Toilet?
Whether or not to apply caulk around the base of a newly installed toilet is a widely debated topic among homeowners and plumbers alike.
Many local municipal building codes require caulking around the toilet base. The main purpose is sanitation: it seals the gap to prevent mop water, bathroom spills, and urine from seeping under the toilet where bacteria and mold can thrive.
However, experienced plumbers caution against applying a solid 360-degree bead of caulk around the entire base.
If you seal the full perimeter and the inner floor gasket fails in the future, the trapped water will have nowhere to escape onto your tile floor. Instead, it will pool invisibly beneath the porcelain base, soaking directly into the wooden subfloor and joists. By the time you notice damage on the ceiling below, thousands of dollars in hidden subfloor rot will have occurred.
The Professional Solution: Caulk the front and two sides of the toilet base with a clean line of mildew-resistant silicone or tub-and-tile caulk. Always leave an intentional 1-inch to 2-inch uncaulked "observation gap" open at the very back edge of the toilet base against the wall.
If the seal ever fails down the road, water will seep out through this rear opening onto the visible tile floor, alerting you to the problem immediately. For a complete look at home plumbing maintenance, review our comprehensive toilet repair guide.
Frequently Asked Questions
Can you replace a toilet wax ring without replacing the toilet?
Yes, absolutely. As long as the porcelain bowl and tank are free of structural cracks, you do not need to purchase a new toilet. You simply unbolt the existing bowl, lift it off the floor, clean away the old crushed wax gasket, inspect the flange, and reinstall the exact same toilet over a fresh replacement seal.
Why does my toilet wobble after installing a new wax ring?
A toilet wobbles after installation when the floor tiles underneath are uneven or the floor flange sits slightly higher than the surrounding floor. Never attempt to stop a wobble by over-tightening the closet bolts, as this will crack the porcelain base. Instead, slide hard plastic, tapered toilet shims into the small gaps under the base edge until the fixture rests perfectly steady, then trim the shims flush and apply caulk.
How do I know if my toilet flange sits too low?
A toilet flange is properly positioned when the bottom lip of the flange rests flush on top of or slightly above (1/4 inch) the finished floor surface. If your flange is level with the subfloor or sunken beneath top layer ceramic tiles, it is too low. In these cases, standard wax rings will leak; you must install a flange extender spacer or use a heavy-duty wax-free rubber seal designed for deep flanges.
Conclusion
Fixing a leaking toilet floor gasket on a budget is an extremely rewarding DIY project that saves money on service fees while protecting your bathroom subfloor from costly water rot. By carefully taking diagnostic steps, selecting the correct replacement seal, and tightening the base bolts evenly without over-cranking, you can enjoy a dry, odorless bathroom floor for years to come.
However, if you uncover severe subfloor wood rot, find a broken cast-iron flange beneath an old home, or discover persistent leaks after replacing the gasket, don't sweat it. The experienced team at All Pro Service Group is always ready to assist. Since 2008, All Pro has provided reliable, high-quality residential plumbing repair services across the Greater Salt Lake Area, including Ogden, Park City, Provo, South Jordan, West Jordan, West Valley City, and Salt Lake City.
Whether you need a quick inspection, flange repair, or help with a stubborn bathroom plumbing leak, contact All Pro today to keep your home's plumbing running smoothly!