The Ultimate DIY Guide to 240 Volt Charger Installation
Why Every EV Owner in Salt Lake Area Needs a 240 Volt Charger Installation
240 volt charger installation is the fastest, most practical way to charge your electric vehicle at home. Here's what you need to know right away:
Quick Answer: How to Install a 240V EV Charger
- Assess your panel- Confirm you have capacity for a dedicated 40-50 amp circuit
- Pull a permit- Required in most Utah municipalities before any work begins
- Choose your setup- Hardwired or plug-in (NEMA 14-50 outlet)
- Run the wiring- 8 AWG wire for 40A, 6 AWG for 48A, through conduit to your panel
- Install a double-pole breaker- Sized at 125% of your charger's continuous load
- Mount and test- Verify charging speed and inspect all connections
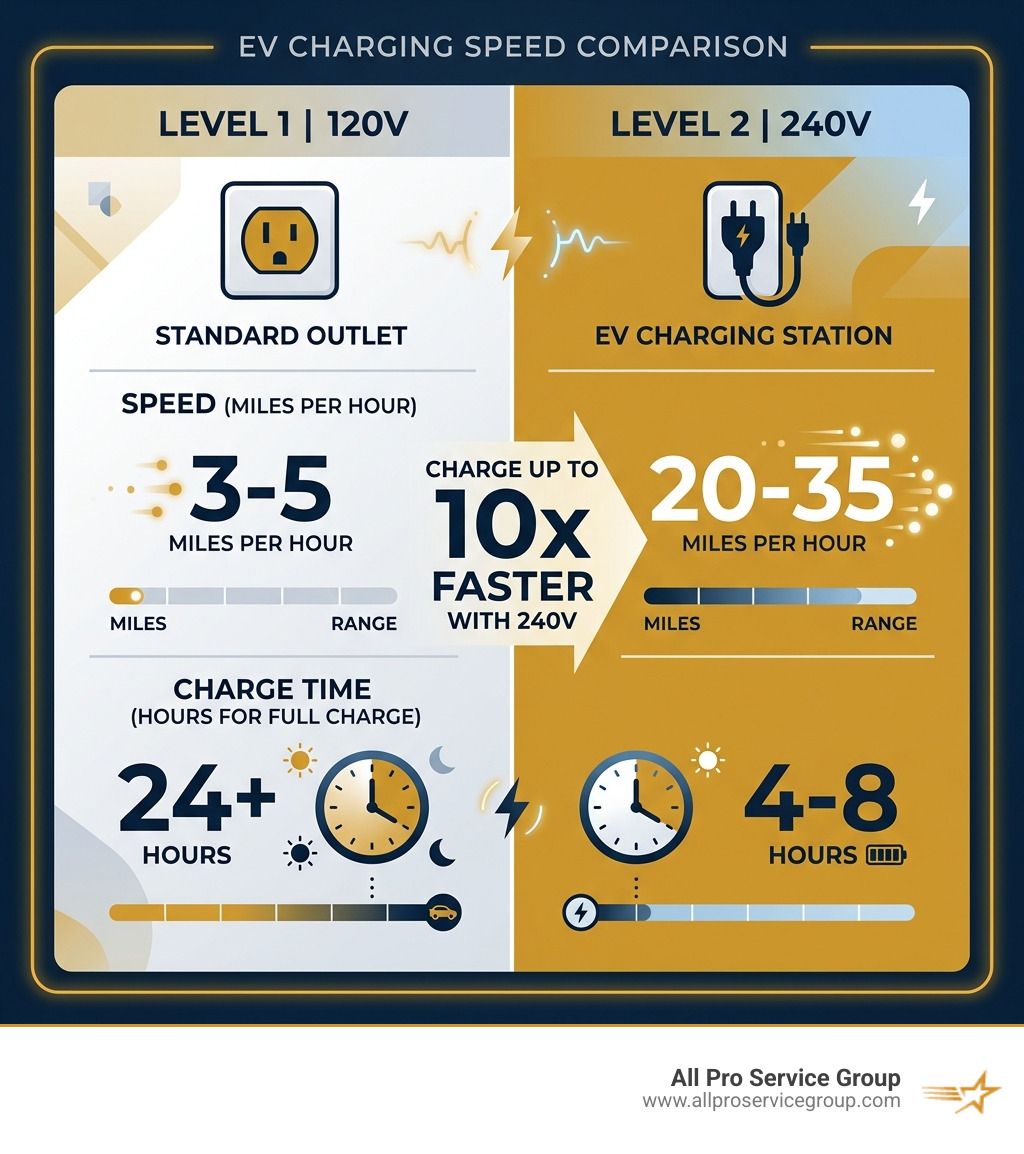
Still using a standard 120V outlet to charge your EV? You're not alone — but it's a frustrating experience. A 120V "Level 1" charger adds only 3-5 miles of range per hour. That means a full charge can take more than 24 hours.
A 240V Level 2 charger changes everything. It delivers 20-35 miles of range per hour — up to 10 times faster — so you plug in at night and wake up to a full battery.
More than 78% of home EV charger units installed today are Level 2 systems. The average total cost runs between $500 and $2,500, and a federal tax credit covers up to 30% (max $1,000) of that expense.
This guide walks you through every step — from checking your electrical panel to mounting the charger and passing inspection.
I'm Gary Leany, owner of All Pro Service Group, a trusted home-services team serving the Greater Salt Lake Valley since 2008 — and 240 volt charger installation is one of the electrical services our licensed team handles regularly alongside HVAC, plumbing, and panel work. If anything in this guide raises questions about your specific home setup, we're here to help.
Understanding the Basics of 240 Volt Charger Installation
When we talk about 240 volt charger installation, we are moving into the realm of "Level 2" charging. While the Level 1 charger that came with your car is basically a fancy extension cord for a standard wall outlet, a Level 2 station is a piece of high-powered electrical equipment.
To understand how this works, think of electricity like water flowing through a pipe. Volts are the water pressure, Amps are the volume of water, and Kilowatts (kW) are the total amount of water delivered. By doubling the voltage from 120V to 240V, we significantly increase the "pressure," allowing your car to gulp down energy much faster.
According to this EV charger installation guide: Safe 240V Power, the efficiency of a 240V system isn't just about speed; it's about reliability. Most modern EVs can accept between 7.7 kW and 11.5 kW of power at home, which requires a dedicated 240V circuit.
Comparison: Level 1 vs. Level 2 Charging
| Feature | Level 1 (120V) | Level 2 (240V) |
|---|---|---|
| Voltage | 120 Volts | 240 Volts |
| Amperage | 12–15 Amps | 16–50 Amps |
| Range Added Per Hour | 3–5 miles | 20–40+ miles |
| Full Charge Time | 20–40+ hours | 4–10 hours |
| Installation | Plug into existing outlet | Dedicated circuit required |
Why Upgrade to a 240V Home Charger?
The most obvious reason is charging speed. If you drive 50 miles a day, a Level 1 charger needs about 12 hours to recover that range. A 240V charger does it in less than two.
Beyond speed, there is the convenience factor. You no longer have to hunt for public chargers or worry if you have enough juice for an unexpected trip to Park City or Provo. Furthermore, home charging is roughly one-third the cost of using a DC fast charger. It's also "kinder" to your battery. Think of Level 2 charging like a nutritious, home-cooked meal, whereas DC fast charging is like greasy fast food—good in a pinch, but not great for long-term health.
Finally, a 240V setup allows you to take advantage of off-peak utility rates. Many providers in the Salt Lake Area offer cheaper electricity overnight. With a Level 2 charger, you can schedule your car to start charging at midnight and still be full by 6:00 AM.
Key Electrical Terms for EV Owners
Before you start your 240 volt charger installation, you need to speak the language of electrons:
- Volts: The electrical "pressure." Standard outlets are 120V; heavy appliances (dryers, ovens, EV chargers) use 240V.
- Amps: The "flow" of electricity. Most Level 2 chargers run on 32, 40, or 48 amps.
- Kilowatts (kW): The total power delivered (Volts x Amps / 1,000).
- Continuous Load: EV charging is a "continuous load" because it draws high power for hours.
- The 80% Rule: Per the National Electrical Code (NEC), a circuit should only carry 80% of its rated capacity for continuous loads. This means a 40-amp charger requires a 50-amp circuit breaker.
Planning and Assessing Your Home’s Electrical System
The heart of your 240 volt charger installation is your main electrical panel. Before buying a charger, we need to make sure your home can actually handle the extra weight.
Most homes built after 1975 in places like South Jordan or West Jordan have a 200-amp service, which is usually plenty for an EV charger. However, older homes in Salt Lake City or Ogden might only have a 100-amp or 150-amp service. If your panel is already packed with breakers for an electric range, AC unit, and hot tub, adding a 50-amp EV circuit might push it over the edge.
Assessing Your Home’s Electrical Capacity
We recommend performing a "load calculation." This isn't just counting empty slots in the panel. It’s about calculating the total potential draw of all your appliances at once. If you see signs of trouble—like flickering lights when the dryer starts or breakers that trip frequently—you likely need an Electrical Panel Upgrade Complete Guide to move forward safely.
You also need physical space. A 240V circuit requires a double-pole breaker, which takes up two adjacent slots in your panel. If your panel is full, we may need to discuss Electrical Panel Upgrades or installing a subpanel.
Choosing the Optimal Installation Location
Where you put the charger matters. Most people choose the garage, but if you park in the driveway, an exterior wall is an option. Consider these factors:
- Proximity to the Port: Where is the charging port on your car? (Front, back, or side?)
- Cable Length: Most chargers come with a 15- to 25-foot cable. You don't want it stretched like a tripwire across the garage.
- Panel Distance: The further the charger is from the electrical panel, the more expensive the Wiring & Rewiring will be due to the cost of heavy-gauge copper.
- Weather Protection: If installing outdoors, ensure the unit is NEMA 4 rated to handle Utah's snow and rain.
Choosing Your Setup: Hardwired vs. Plug-In Outlets
There are two ways to complete a 240 volt charger installation: you can install a 240V outlet (like a dryer plug) or "hardwire" the charger directly into your home's electrical system.
The Benefits of Hardwired Installations
Hardwiring is often the "gold standard" for home charging.
- Higher Power: Hardwired units can support up to 48-amp charging (requiring a 60-amp breaker), adding about 44 miles of range per hour. Plug-in outlets are generally capped at 40 amps.
- Reliability: There is no plug to wiggle loose or outlet to wear out. Sustained high-power draw can actually melt cheap, residential-grade outlets over time.
- Outdoor Safety: Hardwiring is more weather-resistant for outdoor installations.
- Cost Savings: You might save money by not needing an expensive GFCI breaker, as many hardwired chargers have GFCI protection built-in.
Understanding Common 240V Outlet Types
If you prefer the flexibility of a plug-in unit (so you can take the charger with you if you move), you’ll likely need a NEMA 14-50 or NEMA 6-50 outlet.
- NEMA 14-50: This is the most common. It has four prongs and is the same outlet used by RVs and some electric ranges.
- NEMA 6-50: A three-prong outlet often used for welders. It’s slightly easier to wire because it doesn't require a neutral wire.
When opting for an outlet, we strongly suggest an industrial-grade outlet. As noted in How to Install a 240V Outlet for EV Charging at Home | Recharged, industrial-grade receptacles have 3 to 5 times less electrical resistance than standard ones, which is vital when pulling high current for 8 hours straight. For help with the physical box, check out our Outlet and Switch Installation services.
Step-by-Step Instructions for Your Home Setup
Ready to get your hands dirty? Here is the general process for a
240 volt charger installation. Please remember: working inside an electrical panel can be fatal if you make a mistake.
1. Permits and Prep
Before you touch a screwdriver, check with your local building department in West Valley City or Salt Lake. You will need an electrical permit. This ensures your work is inspected and stays compliant with
NEC Article 625, which governs EV charging systems.
2. Power Down
Shut off the
main breaker. Use a non-contact voltage tester to verify the panel is dead. Never assume a circuit is off just because the switch is flipped.
3. Run the Conduit and Wire
You’ll need to run heavy-duty wire from the panel to the charger location.
- For a 40-amp charger (50-amp breaker), use 8 AWG copper wire.
- For a 48-amp charger (60-amp breaker), use
6 AWG copper wire. Run these wires through protective conduit (like EMT or PVC) to prevent physical damage.
4. Install the Breaker
Snap a new double-pole breaker into the panel. Connect the two "hot" wires (usually black and red) to the breaker. Connect the ground wire (green or bare) to the ground bar. If you're using a NEMA 14-50 outlet, you'll also connect a white neutral wire to the neutral bar.
5. Mount the Charger
Mount the charging unit at a comfortable height—usually
18 to 48 inches off the floor. Ensure it is securely fastened to a wall stud; these units and their heavy cables can be quite heavy.
6. Final Connections and Testing
Follow the
EV Charger Install Guide for your specific brand. Use a torque wrench to tighten all connections to the manufacturer's exact specifications. Loose connections create heat, and heat creates fires. Once everything is tight, turn the power back on and use a multimeter to check for 240V across the hot leads.
Safety Protocols for 240 Volt Charger Installation
According to
How to Install a 240 Volt Tesla Charger: A Step-by-Step Guide, safety is paramount. Always wear safety glasses and insulated gloves. If you are installing in a garage or outdoors, ensure you are following local codes regarding
GFCI (Ground Fault Circuit Interrupter) protection. While some chargers have this built-in, Utah inspectors may still require a GFCI breaker for outlet-based setups.
Installation Costs, Incentives, and Detached Garages
How much is this going to set you back? For a standard
240 volt charger installation where the panel is in the garage, you’re looking at
$500 to $1,500. If we have to move mountains (or at least run wires across the whole house), costs can climb to $2,500.
Factors Influencing Installation Price
- Distance: Copper wire is expensive. A 50-foot run costs significantly more than a 5-foot run.
- Panel Upgrades: If your 100-amp panel is full, a service upgrade to 200 amps can cost $2,000 to $4,000.
- Hardwired vs. Plug-in: Hardwiring is often slightly cheaper because you don't need to buy an expensive industrial outlet and a GFCI breaker.
Incentives and Savings
Don't forget the
Federal Tax Credit (Section 30C)! You can claim 30% of the hardware and installation costs, up to $1,000. Additionally, check with your local utility provider in the Salt Lake Area; many offer rebates ranging from $200 to $500 for installing "smart" Level 2 chargers.
Special Considerations for Detached Garages
Installing a charger in a detached garage is a bigger project. Per the Install a 240v EV Charger in a Detached Garage | Prked guide, you generally cannot just run an extension cord.
- Trenching: You must dig a trench at least 18 inches deep for PVC conduit between the house and the garage.
- Subpanel: You’ll likely need to install a subpanel in the garage to handle the EV charger and existing lights/outlets.
- Grounding: Detached structures require their own grounding rods driven into the earth.
Frequently Asked Questions about 240V Charging
Can I install a 240V EV charger myself?
Technically, yes, if you are comfortable with high-voltage electrical work and local codes. However, we don't recommend it for most homeowners. A mistake in a
240 volt charger installation can lead to electrical fires or void your homeowner's insurance. If you aren't 100% confident, it's better to call a pro.
Do I need a permit for a 240V charger installation?
Yes. In Ogden, Provo, and throughout the Salt Lake Valley, adding a new 240V circuit requires a permit and a safety inspection. Skipping this can cause massive headaches when you try to sell your home later.
Can I use my existing dryer outlet for EV charging?
Maybe, but it’s rarely ideal. Dryer outlets (NEMA 14-30) are only rated for 30 amps, meaning you can only charge at 24 amps. Also, these outlets aren't designed for the "plug-unplug" cycle of daily car charging. You're much better off installing a dedicated circuit.
Conclusion
A 240 volt charger installation is one of the best upgrades you can make for your home and your EV lifestyle. It turns "range anxiety" into "range confidence," allowing you to enjoy the full potential of your electric vehicle.
At All Pro Service Group, we’ve been the "Gephardt Approved" choice for the Greater Salt Lake Area since 2008. Whether you’re in West Jordan, South Lake, or any of our surrounding communities, our licensed electricians ensure your installation is safe, permitted, and built to last. We handle everything from the initial load calculation to the final inspection.
Ready to stop trickling and start charging? Contact us today for
Professional 240 Volt Charger Installation Services. We’re available 24/7 to power your home’s future!