The Ultimate Guide to Replacing Your Septic Tank Float Switch
Understanding Your System and Choosing the Right Septic Tank Float Switch Replacement
Before we roll up our sleeves, we need to understand exactly what we’re looking at inside that tank. A float switch is essentially a waterproof light switch that is flipped by the buoyancy of water rather than your finger. As the effluent (liquid waste) rises, the float tips up, completing an electrical circuit that tells the pump, "Hey, time to get to work!" When the level drops, the float hangs down, breaking the circuit and stopping the pump.
However, not all switches are created equal. Choosing the wrong one for a septic tank float switch replacement can lead to a burnt-out pump or a tank that never empties.
Float Mechanisms: The Science of Buoyancy
Most switches use either a mechanical ball bearing or a mercury tilt switch. While mercury switches were long considered the gold standard for reliability, they are increasingly being replaced by mercury-free mechanical versions due to environmental regulations. Modern mechanical switches, like the "Sludge Boss," use internal stainless-steel balls to orient the switch, making them incredibly durable for harsh septic environments.
Normally Open vs. Normally Closed
This is the most critical distinction to get right:
- Normally Open (N/O): This is the standard for "pump down" applications. The circuit is "open" (off) when the float is hanging down. When the water rises and the float tips up, the circuit "closes" (turns on), activating the pump.
- Normally Closed (N/C): This is used for "pump up" applications, like filling a tank from a well. The circuit is "closed" (on) when the float is down and "opens" (turns off) when it rises.
Wide-Angle vs. Narrow-Angle.
- Wide-Angle: These require a significant swing (usually about 90 degrees) to toggle. We use these for pump control to prevent "short-cycling," where the pump turns on and off too rapidly due to small ripples in the water.
- Narrow-Angle: These toggle with only about 10 degrees of movement. We use these almost exclusively for high-water alarms where we need an immediate alert the second the water hits a certain level.
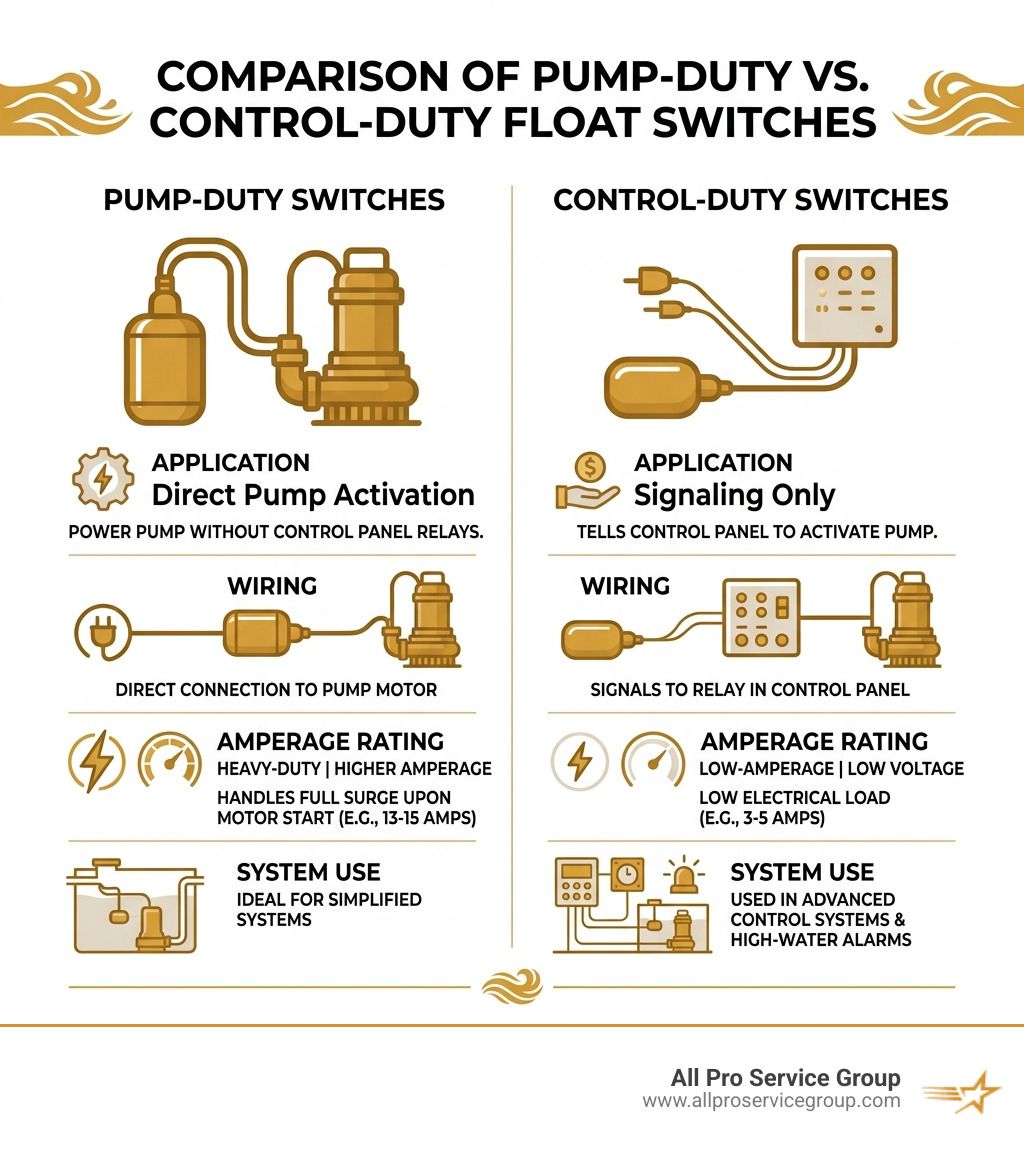
Amperage and Duty Ratings
You must match the switch to the electrical load it will carry.
- Pump-Duty Switches: These are heavy-duty. They are wired directly to the pump and handle the full "surge" of electricity when the motor starts (often 13 to 15 amps).
- Control-Duty Switches: These are low-amperage (usually 3 to 5 amps). They don't power the pump directly; instead, they send a signal to a control panel, which then flips a larger relay to start the pump.
If you're unsure which one you need, you can find more detailed specs at Septic Tank Float Switches - For Pumps & Control Panels.
Choosing the Right Septic Tank Float Switch Replacement
When you're ready to buy, look at your pump’s horsepower (HP). Most residential effluent pumps are 1/2 HP or 1/3 HP. A switch like the Sludge Boss or Superior Pump 92000 is typically rated for up to 1/2 HP. If you have a massive grinder pump or a high-HP industrial motor, you’ll likely need a switch that runs through a contactor or relay.
Piggyback vs. Hardwired
This is the "User Experience" part of septic repair.
- Piggyback Plugs: These are the easiest for DIYers. The float switch has a plug with a outlet on the back of it. You plug the float into the wall, and then plug the pump into the back of the float plug. No wire stripping required!
- Hardwired: These require splicing wires inside a junction box. This is common in professional installations and systems with dedicated control panels. If you're dealing with hardwired systems, our Plumbing Repair experts can ensure the connections are 100% waterproof—which is vital when electricity meets liquid waste.
Tethered vs. Vertical
- Tethered Floats: These are the most common. The float is attached to a cable that is clamped to the pump or a discharge pipe. The length of the "tether" determines how much the water level changes before the pump kicks in.
- Vertical Switches: These move up and down on a rigid rod. They are great for very small, cramped tanks where a tethered float might get stuck on the wall or the pump itself.
Testing Your Septic Tank Float Switch Replacement
Before you finalize the installation, you must test the switch. We never want to close a septic lid without being 100% sure the pump will trigger.
- The Manual Lift Test: With the power on (and being very careful!), manually lift the float switch. You should hear the pump hum or see the water level begin to drop.
- Continuity Check: If the pump isn't running, use a multimeter set to "Continuity" or "Ohms." With the power off and the switch disconnected, tilt the float up. Your meter should beep or show near-zero resistance. If it stays "Open" (OL), the switch is bad.
- Voltage Meter: Check the outlet or junction box to ensure the pump is actually receiving the 115V or 230V it requires. Sometimes the "float problem" is actually a tripped breaker.
- Bypass Testing: If you have a piggyback switch, unplug the pump from the float and plug the pump directly into the outlet. If the pump runs, you know for a fact the float is the culprit. If it doesn't, you might be looking at a Sump Pump Repair or a full pump replacement.
Common Signs of a Failing Septic Float Switch

How do you know it’s time for a septic tank float switch replacement? Your system usually tries to tell you before the big backup happens.
- Pump Short-Cycling: If you hear your pump clicking on and off every few seconds, the float might be waterlogged or positioned incorrectly. This will burn out your pump motor faster than you can say "plumbing emergency."
- Continuous Running: If the pump never stops, the float is likely stuck in the "up" position, often snagged on a pipe or caked in "fatbergs" (congealed grease). This can lead to a burnt-out pump and a very high electric bill.
- High-Water Alarm: This is the most obvious sign. If that red light is glowing or the buzzer is screaming, your pump isn't keeping up, and the float is the first suspect.
- Sewage Backup: If you see water pooling in your yard over the tank or, heaven forbid, coming up through the basement drains, the float has failed to trigger the pump.
- Slow Drains and Odors: When the tank is too full, the air has nowhere to go, causing gurgling in your pipes and foul smells around the house. If you notice these signs, check out our Sewer Services page for professional diagnostic help.
Step-by-Step Septic Tank Float Switch Replacement
If you’ve diagnosed a dead switch, here is how we handle a professional
septic tank float switch replacement.
1. Safety First
Disconnect the power. Don't just turn off the switch; flip the breaker. Septic tanks are wet, metallic, and grounded—the perfect recipe for a lethal electrical shock if things go wrong.
2. Access and PPE
Remove the tank lid. Wear heavy-duty waterproof gloves and eye protection. Septic tanks contain bacteria and gases that you don't want on your skin or in your eyes. Ensure the area is well-ventilated; methane and hydrogen sulfide can be dangerous in high concentrations.
3. Remove the Old Hardware
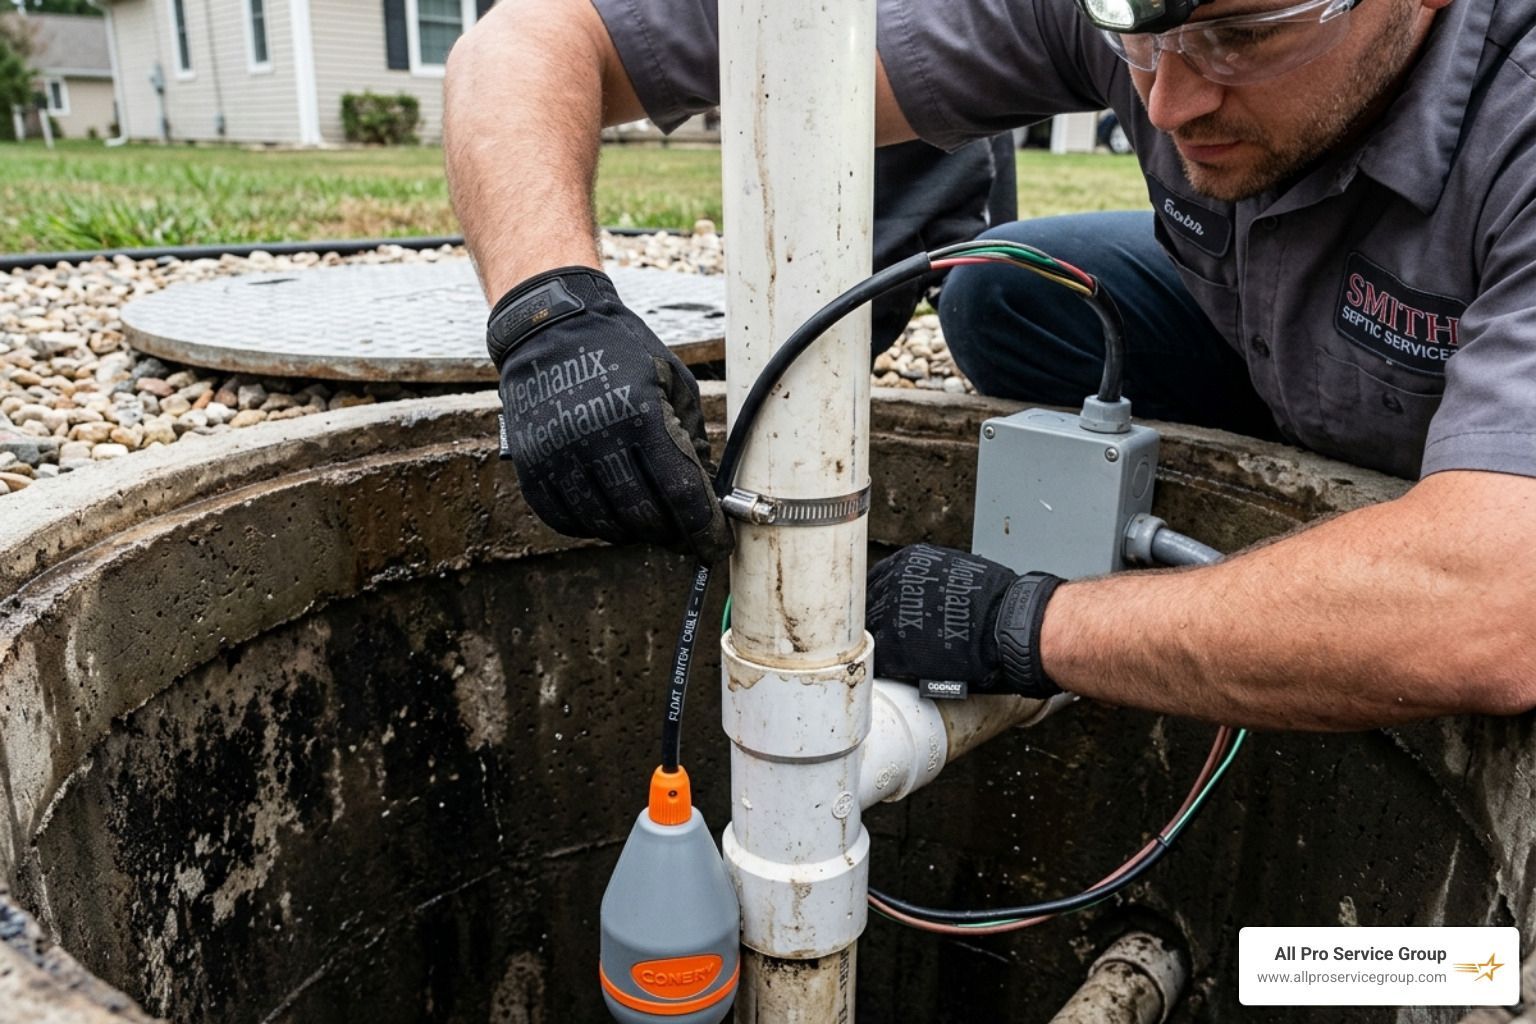
Locate where the float is tethered. It's usually clamped to the pump's discharge pipe with a stainless steel hose clamp or a plastic zip tie. Cut the old tether and pull the wire out through the conduit.
4. Wiring and Splicing
If it’s a hardwired system, you’ll need to strip the wires of the new switch.
- Pro Tip: Use waterproof, resin-filled wire nuts or heat-shrink butt connectors. Standard electrical tape will fail in a matter of weeks inside a humid septic tank.
- The "Hot" Line: In a standard 115V system, the float switch is spliced into the "hot" (usually black) wire.
5. Setting the Tether
This is the "Goldilocks" part of the job. If the tether is too short, the pump will cycle too often. If it's too long, the float might hit the bottom of the tank or get tangled. A common tether length is 3 to 6 inches from the pivot point. Secure it tightly so it won't slip over time.
For a more visual guide, you can check this Comprehensive Guide on Replacing Your Septic Pump Float Switch.
6. Final Test and Cleanup
Restore power and fill the tank with a garden hose to watch the cycle. Ensure the pump starts at the right height and stops before the pump starts sucking air. Once confirmed, secure the lid tightly.
Safety Precautions and Maintenance Tips
Working on a septic system isn't just dirty; it can be dangerous.
- Confined Spaces: Never, ever climb into a septic tank. The gases can knock you unconscious in seconds. All work should be done from the surface using long-reach tools.
- Grease is the Enemy: Avoid pouring fats, oils, and grease (FOG) down the drain. These solidify in the tank and coat the float switches, making them heavy and prone to sticking.
- Annual Inspections: We recommend an annual check-up. We can test the float, check the sludge levels, and ensure your effluent filter is clean. This prevents 90% of emergency calls.
- Component Longevity: If your pump is over 10 years old and the float fails, consider replacing both. An old pump draws more amperage, which can actually "cook" the contacts inside a brand-new float switch.
If you ever feel overwhelmed or run into a "stinky" situation you can't handle, our Emergency Plumbing team is available 24/7 throughout the Greater Salt Lake area.
Frequently Asked Questions about Septic Float Switches
How much does a septic float switch replacement cost?
The parts themselves are relatively affordable. A high-quality, heavy-duty float switch like the Sludge Boss or a SJE-Rhombus model typically costs between $50 and $100. If you hire a professional in the Salt Lake Valley, the total cost for parts and labor usually ranges from $200 to $450, depending on the complexity of the wiring and the depth of the tank. While DIY saves on labor, a professional installation comes with a warranty and the peace of mind that your yard won't turn into a swamp next week.
Can I replace a septic float switch myself?
Yes, if you are comfortable with basic electrical work and don't mind getting a bit dirty. If your system uses a "piggyback" plug, it's a very simple DIY task. However, if the system is hardwired into a control panel or requires working in a deep, dark riser, the risks of electrical shock or improper sealing are higher. If you're unsure, it's always safer to call in the experts.
How often should I inspect my septic float switches?
We recommend a quick visual inspection once a year. If you have a high-water alarm, test it every six months by manually lifting the alarm float (usually the highest one in the tank). Most float switches are rated for 100,000 to 1,000,000 operations, meaning they can last 7 to 10 years, but harsh chemicals or heavy grease buildup can shorten that lifespan significantly.
Conclusion
Your septic system is the unsung hero of your home, and the float switch is its primary communicator. Keeping it in good working order is the best way to avoid the "messy and expensive" problems that give homeowners nightmares. Whether you need a simple septic tank float switch replacement or a complete system overhaul, we’re here to help.
At All Pro Service Group, we’ve been serving the Greater Salt Lake Area—from Ogden and Park City down to Provo and the entire Salt Lake Valley—since 2008. We are "Gephardt Approved," meaning we take our reputation for honesty and quality seriously. Our expert technicians are available 24/7 for those middle-of-the-night emergencies, and we offer transparent pricing and financing to make sure your home stays safe and functional.
Don't wait for the alarm to sound. If your drains are slow or your pump is acting up, contact us today for a dependable Plumbing Repair or inspection. We'll get your system flowing exactly the way it should!