When Your Garbage Disposal Breaks Down: What to Do First
Need to fix garbage disposal problems fast? Here's a quick overview of the most common fixes:
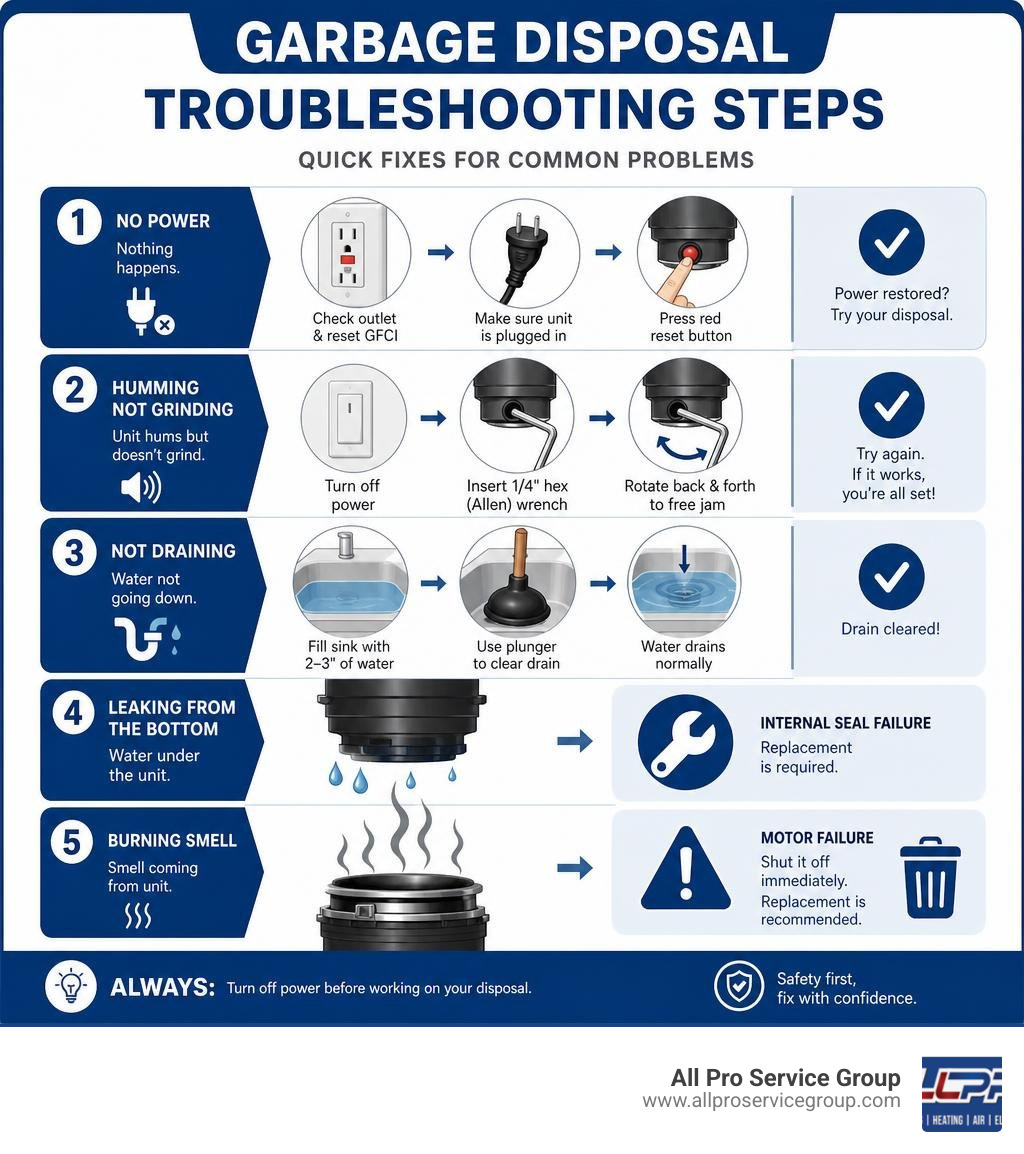
- Nothing happens, no sound — Check that the unit is plugged in, reset the GFCI outlet, and press the red reset button on the bottom of the unit.
- Humming but not grinding — Turn off power, insert a 1/4-inch hex (Allen) wrench into the bottom socket, and rotate back and forth to free a jammed flywheel.
- Not draining — Use a plunger with 2–3 inches of water in the sink to clear the drain line.
- Leaking from the bottom — This usually means internal seal failure. Replacement is required.
- Burning smell — Shut it off immediately. This signals motor failure and the unit likely needs replacing.
It's one of those moments that always seems to happen at the worst time — you flip the switch, and instead of the familiar grinding sound, your disposal just hums, rattles, or does nothing at all. The good news? According to the Plumbing-Heating-Cooling Contractors Association (PHCC), most garbage disposal failures are caused by user error, not unit failure. That means the fix is often simpler than you think, and in many cases you can handle it yourself in under 10 minutes.
Garbage disposals have an average lifespan of around 12 years, and when something goes wrong before that mark, a professional repair typically runs $145–$305 — or you can often skip that cost entirely with the right troubleshooting steps.
At All Pro Service Group, our plumbing team has helped homeowners across the Greater Salt Lake Valley fix garbage disposal problems of every kind — from simple resets to full replacements. In the sections below, we'll walk you through everything you need to know to diagnose and repair your unit safely.
Safety and Tools: Crucial Steps Before You Fix Garbage Disposal Units
Before you roll up your sleeves and dive under the kitchen sink, let’s talk about safety. A garbage disposal is a powerful electrical appliance connected directly to your plumbing system. Mixing electricity, water, and metal grinding components means safety isn't just a suggestion—it is the absolute first step.
At All Pro Service Group, we always emphasize a "safety first" protocol. Never, under any circumstances, place your bare hands or fingers inside the garbage disposal hopper. Even if you are certain the unit is turned off, the shredder ring has sharp metal edges, and a sudden mechanical release can cause severe injury.
Step-by-Step Safety Protocol
- Cut the Power Completely: Do not rely solely on the wall switch. Turn the wall switch to the "off" position, then physically unplug the unit from the electrical outlet beneath your sink.
- Flip the Breaker: If your garbage disposal is hardwired directly into your home's electrical system, locate your main electrical service panel and flip the circuit breaker labeled "Disposal" to the "off" position.
- Verify Dead Power: Use a non-contact voltage tester around the unit's power cord or hardwired connection to confirm that no electrical current is active.
Essential Tools to Gather
To successfully fix garbage disposal issues, you will need a small, reliable kit of household tools. Keep these nearby so you aren't scrambling mid-repair:
- Flashlight: Essential for seeing into the dark depths of the disposal chamber and the tight spaces under the sink.
- Safety Goggles: To protect your eyes from any unexpected splashes of dirty water or flying debris.
- Needle-Nose Pliers or Long-Handled Tongs: Your primary tools for retrieving jammed objects.
- Hex Wrench (Allen Key): Typically a 1/4-inch size, which fits the manual breaker socket on the bottom of almost all modern garbage disposals.
- Bucket and Towels: To catch any water when disconnecting pipes.
If you run into more complex plumbing issues during this process, or if you find that your pipes are showing signs of age, check out our complete plumbing repair guide for expert advice on keeping your home's system in top shape.
Troubleshooting and Unjamming a Malfunctioning Unit

When a garbage disposal stops operating normally, it generally falls into one of two categories: an electrical issue or a mechanical failure. Identifying which type of problem you are facing is half the battle.
To help you quickly diagnose your unit before you begin, we have put together this symptom-to-cause reference table:
| Symptom | Primary Cause | Likely Issue Type |
|---|---|---|
| Completely silent when switched on | No electrical power reaching the motor | Electrical |
| Loud humming or buzzing, but no spinning | Flywheel or impellers physically jammed | Mechanical |
| Water backing up into the sink basin | Blockage in the drain line or P-trap | Mechanical / Drainage |
| Water dripping from the bottom of the unit | Worn internal motor seals (non-repairable) | Mechanical / Structural |
| Rattling, metal-on-metal scraping noises | Loose mounting or foreign metal object inside | Mechanical |
| Burning smell during operation | Motor windings overheating or failing | Electrical / Mechanical |
For a deeper dive into diagnosing these specific symptoms, you can also consult this detailed guide on How to Fix Garbage Disposal: 10 Problems Solved.
How to Reset a Silent Unit
If you flip the wall switch and hear absolutely nothing—no hum, no click, no buzz—your unit is likely receiving no power. Garbage disposals are equipped with a built-in thermal overload switch designed to trip and cut off power before the motor windings overheat and catch fire.
Here is how to reset a silent unit:
- Turn the wall switch off.
- Look under the sink at the very bottom of the disposal unit. You will see a small, square red or black button. This is your disposal’s personal circuit breaker.
- If the button is popped out (protruding about a quarter of an inch), the thermal switch has tripped.
- Crucial step: Allow the motor to cool down for 15 to 20 minutes. If you try to press it immediately, it may simply pop right back out.
- Once cooled, firmly press the red button back in. You should hear a distinct click.
- If the button does not stay in, or if the unit remains silent, test your kitchen’s GFCI outlet. Press the "Reset" button on the outlet itself.
- Finally, check your home's main circuit breaker panel to ensure the breaker has not tripped.
How to Fix Garbage Disposal Humming Issues
A humming noise is a classic sign of a mechanical jam. The motor is receiving electricity and wants to spin, but the grinding plate (flywheel) is physically blocked by a hard object. When this happens, the motor works overtime, creating a loud hum.
Do not keep the switch turned on while the unit is humming! If left on for more than 30 seconds, the motor will overheat, causing the thermal overload switch to trip—or worse, damaging the motor permanently. If you suspect a serious electrical malfunction or are dealing with a clogged drain line that won't budge, don't hesitate to reach out for professional emergency plumbing assistance.
The Hex Wrench Method for Stubborn Jams
Most modern garbage disposals (including Moen, InSinkErator, and similar models) feature a hexagonal hole in the center of the bottom of the motor housing. This hex socket connects directly to the motor shaft, allowing you to manually rotate the flywheel and break up stubborn jams without ever touching the inside of the hopper.
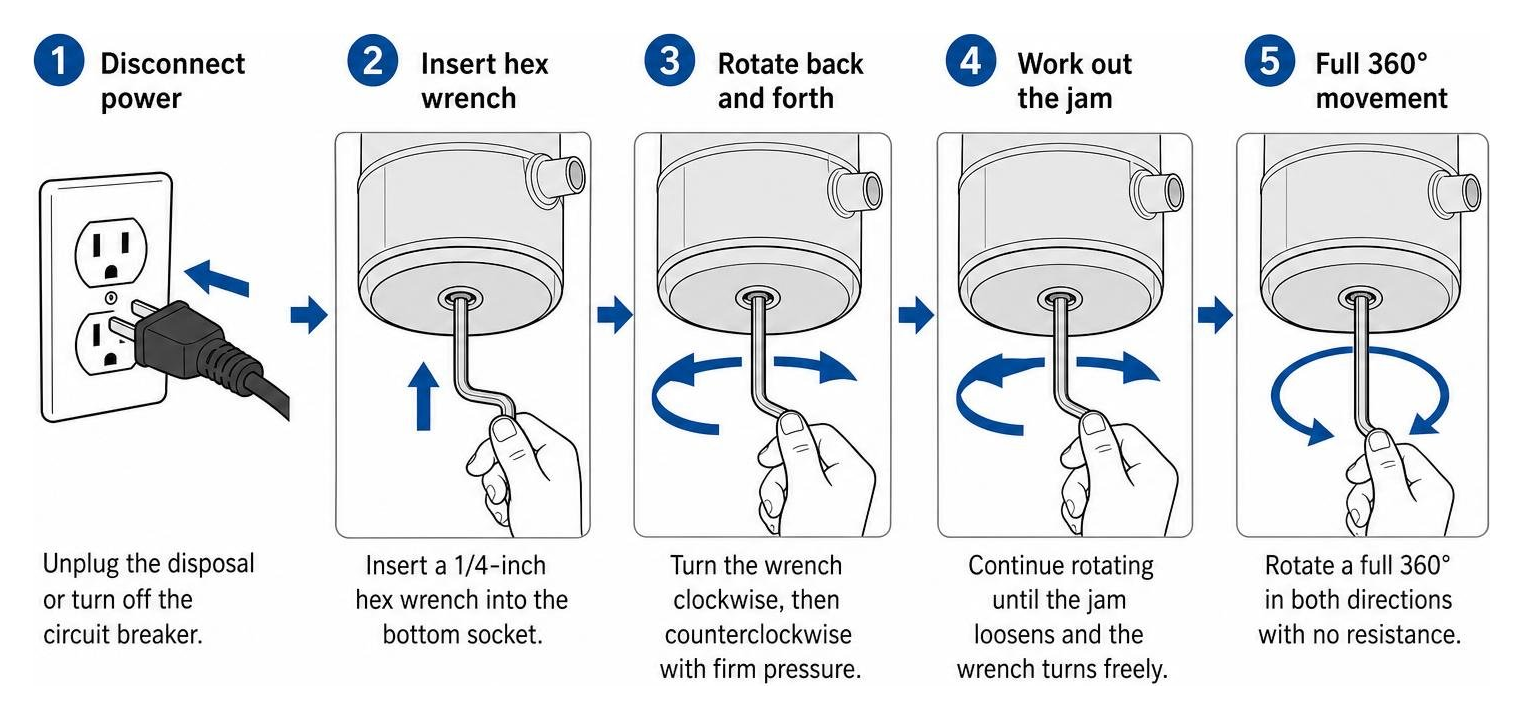
- Ensure the power is completely disconnected at the plug or breaker.
- Insert a 1/4-inch hex wrench (often called an Allen key) into the bottom socket.
- Firmly work the wrench back and forth in clockwise and counterclockwise directions.
- At first, it may feel locked. Apply steady, firm pressure. You are not going to break the unit; the wrench is designed to handle this mechanical force.
- Continue rotating the wrench until you can spin it a full 360 degrees in both directions with no resistance.
- Once the flywheel spins freely, remove the wrench.
Safely Removing Glass, Bones, and Foreign Objects
Once the hex wrench has loosened the jam, the offending object is still resting inside the grinding chamber. If you don't remove it, the moment you turn the power back on, the object will jam the impellers again.
- Inspect with a Flashlight: Shine a bright light down through the sink drain. Look for the culprit—often a coin, a fruit pit, animal bones, or glass shards.
- Use Tongs or Pliers: Reach into the chamber with long-handled tongs or needle-nose pliers to grasp and retrieve the debris. Never use your fingers!
- Clearing Crushed Glass: If a drinking glass or ceramic dish shattered in your sink, you may have hundreds of tiny shards wedged under the grinding plate. Use a wet/dry shop vacuum with a narrow hose attachment to suck out the tiny glass particles.
- The Sponge Trick: Alternatively, you can use a damp kitchen sponge held firmly in a pair of long-handled tongs to press down onto the grinding plate, picking up the small, sharp fragments.
How to Address Leaks, Replacements, and Maintenance

A leaking garbage disposal can quietly rot your under-sink cabinetry, leading to mold growth and expensive structural repairs. Because your disposal is connected to both your sink basin and your wastewater pipes, leaks can spring from several different locations.
Step-by-Step Guide to Fix Garbage Disposal Leaks
To fix a leak, you must first pinpoint its exact origin. Dry the entire unit thoroughly with a towel, lay a dry paper towel beneath the disposal, and run a gentle stream of water down the drain. Watch where the first drops appear.
- Leak at the Sink Flange (Top): If water is dripping from the very top where the disposal meets the sink, the seal has failed. You will need to loosen the mounting bolts, pry the flange up slightly from the sink side, scrape away the old, dried plumber's putty, apply a fresh bead of new plumber's putty, and retighten the mounting assembly.
- Leak at the Connections (Side): Your disposal has two side connections: the main wastewater discharge pipe and the dishwasher drain hose. If water is dripping here, tighten the metal hose clamps or the screws on the discharge pipe flange. If the leak persists, replace the rubber gaskets or washers inside these fittings.
- Leak from the Bottom of the Unit: If you see water dripping directly out of the bottom metal housing or through the electrical wire relief hole, we have some tough news. This indicates that the internal motor shaft seals have degraded, allowing water to pass through the motor itself. This is a non-repairable failure. For an honest, detailed look at why this happens, you can read this breakdown on How to Fix a Garbage Disposal Leaking From the Bottom (Honest Answer: You Don't), HomeFixer101.
If you are replacing your unit or clearing out old plumbing fixtures, make sure to follow local waste disposal guidelines. You can review the South Jordan Garbage & Recycling Guidelines to ensure you are disposing of your old appliance in an environmentally responsible manner.
When to Replace vs. Repair Your Unit
How do you know when it is time to stop repairing and start shopping for a new unit? We recommend applying the 50 percent rule: if the cost of repairing your current garbage disposal exceeds 50% of the cost of buying and installing a brand-new unit, it is time for a replacement.
If your disposal is approaching its 10-to-12-year average lifespan, has a cracked outer shell, a burned-out motor, or is leaking from the bottom, a replacement is by far your best long-term investment. Buying a basic, reliable replacement unit typically costs between $80 and $250 depending on the horsepower, while professional installation is straightforward and trouble-free when handled by an expert.
Preventive Maintenance and Foods to Avoid
The best way to fix garbage disposal issues is to prevent them from happening in the first place. By adopting a few simple kitchen habits, you can easily double the lifespan of your unit and keep it running odor-free.
- Always Use Cold Water: Run a strong stream of cold water before, during, and for 15 seconds after grinding food. Cold water keeps food fats and grease solid, allowing the blades to chop them up and flush them down the drain. Hot water melts grease, which then coats your pipes further down the line and creates stubborn clogs.
- Avoid the "Never-Ever" List: Never put cooking oils, grease, animal fat, fibrous vegetables (like celery, artichokes, or corn husks), starchy foods (like pasta, rice, or potato peels), coffee grounds, eggshells, or large animal bones down your disposal. These items will either wrap around the impellers, create sticky pastes that clog your drain, or dull the grinding mechanism.
- Clean Regularly with Ice and Citrus: Once a month, toss a handful of ice cubes and a tablespoon of rock salt down the disposal, then run the unit with cold water. The hard ice scours the grinding chamber and breaks up stubborn slime. Follow this up by grinding a few fresh lemon or orange peels to leave your kitchen smelling bright and clean.
If you find that your kitchen drain is running sluggishly despite a clear disposal, it might be time for professional assistance. Consider scheduling a thorough drain cleaning in Salt Lake City to clear out years of built-up grease and debris from your kitchen pipes.
Frequently Asked Questions About Garbage Disposal Repair
Why is my garbage disposal humming but not spinning?
A humming disposal is almost always caused by a physical jam. A hard object—like a fruit pit, a stray utensil, or a thick bone—has become wedged between the rotating flywheel and the stationary shredder ring. The motor is receiving electrical power but cannot rotate, creating the hum. Turn off the power immediately and use the hex wrench method on the bottom of the unit to manually free the jam.
Can I use chemical drain cleaners to clear a disposal clog?
No, you should never use chemical drain cleaners in a garbage disposal. These harsh, caustic chemicals can quickly corrode the internal rubber seals, gaskets, and metal components of your disposal, leading to premature motor failure and leaks. Furthermore, if the clog doesn't clear, you will be left with a sink basin full of toxic, caustic water that is highly dangerous to work with. Instead, use natural alternatives like baking soda and vinegar, followed by a flush of hot water, or clear the clog mechanically with a plunger.
How long does a typical garbage disposal last?
The average lifespan of a standard garbage disposal is about 12 years. High-quality models featuring stainless steel grinding components can easily last up to 20 years with proper care, regular cleaning, and mindful usage habits. If your unit is over a decade old and begins experiencing frequent jams, leaks, or motor failures, it is generally more cost-effective to replace it.
Conclusion
A jammed or malfunctioning garbage disposal doesn't have to ruin your week or drain your wallet. By following these simple troubleshooting steps, you can safely reset, unjam, and maintain your kitchen's most hardworking appliance in just a few minutes.
However, if you find yourself facing a stubborn leak, a completely dead motor, or complex plumbing issues under your sink, we are here to help. All Pro Service Group has been proudly serving the Greater Salt Lake Area—including Salt Lake City, South Jordan, West Jordan, West Valley City, South Salt Lake, Ogden, Park City, and Provo—since 2008. As a "Gephardt Approved" home service provider, our trained, licensed experts are dedicated to delivering dependable repairs, honest advice, and exceptional customer service.
Ready to get your kitchen back in perfect working order? Contact us today to schedule our professional plumbing repair services and let our team handle the dirty work for you!